Importing Outlook Folders to Office 365 – A Streamlined Approach to Importing Outlook Archives


If you are seeking a reliable method to import Outlook folders to Office 365, this guide provides various solutions. In this article, we address the concerns of users facing challenges with the import process. We present four distinct methods to transfer your data seamlessly to Office 365.
“I have over 500 mailboxes to import, and I am uncertain where to begin the process. I attempted the Network Upload method independently, but the outcome was unsatisfactory. Can someone assist me in finding a suitable method?”
Many users, like the one mentioned above, encounter similar issues while importing their mailboxes to Office 365. They are unaware of the most appropriate method to use.
As technology evolves, individuals and organizations embrace the latest cloud technology, such as Office 365. Many prefer to migrate their .pst files to Office 365 to leverage its user-friendly interface.
Moreover, if you have Outlook folders in PST format stored on your system, it is high time to commence the process of importing them to the cloud.
Before discussing the methods, let’s first explore the different scenarios for importing PST files to Exchange Online.
Why Import Outlook Folders to Office 365?
First and foremost, PST files are delicate and prone to corruption if left unused for extended periods. To safeguard your vital data, the only solution is to import Outlook folders to Office 365.
Furthermore, consider a scenario where an organization has backed up all sent emails in PST format on their desktop. Now, there arises a requirement to access these sent items for investigation purposes. To open these important files, it becomes necessary to import the PST files to Office 365.
Hence, importing Outlook PST files to Office 365 is a proactive measure to ensure data integrity.
Now, let’s delve into an in-depth discussion of the four different methods for importing PST files.
Four Different Ways to Import Outlook Archive to Office 365
These four methods comprise three manual approaches and one automated approach.
Manual Methods to Import Outlook Folders to Office 365
- Import/Export Wizard
- Drive Shipping Method
- Network Upload Method
- Automated Method
Using a Professional Tool to Import Outlook Archive to Office 365
However, it’s important to note that manual methods have their limitations, which is why IT administrators often prefer the automated approach due to its various advantages.
Let’s discuss each method in detail, starting with the manual methods.
Manual Import of Outlook Folders to Office 365
If you only have a few PST files to import to Office 365, you can use the Import/Export Wizard, a native method supported by Microsoft. Follow these steps after configuring your Outlook account:
- Open MS Outlook, go to the File tab and click on Open & Export >> Import/Export.
- In the next window, select the file type, Outlook Data File (.pst), and click “Next.”
- Choose the desired PST file path to import by clicking the Browse button.
- Select the “Include subfolders” option to import the entire file.
- Provide your Office 365 ID and click “Finish.”
- Please note that this method is not suitable for users looking to import a large number of Outlook files.
Import Outlook Archive to Office 365 Using Drive Shipping Method
The Drive Shipping Method can be employed for bulk import of PST files, albeit for $2 per GB of data to be imported.
In this method, you need to copy the PST files to a hard drive and physically send them to Microsoft. Once Microsoft receives the hard drive, their representative will proceed to transfer the PST files to your Office 365 account. However, it’s important to note that this facility is available only in limited countries, and there is a maximum limit of sending 10 drives at a time.
Considering the cost and convenience, this method is not recommended if you have a large amount of data, such as several terabytes.
The Network Upload Method is the next option, which involves a technical approach using the PowerShell scripting language. Before attempting this method, it is crucial to have expertise in the language. Otherwise, you may encounter unsatisfactory results, as discussed earlier, or even risk data corruption.
Therefore, it is evident that manual methods cannot be considered as a one-stop solution for importing data.
Fortunately, an automated method exists that overcomes the challenges associated with manual methods.
Effortlessly Import Outlook Folders to Office 365 Using a Professional Tool
Not every individual or organization has the same requirements when it comes to importing documents to Office 365. However, the PST to Office 365 Migration Tool caters to the unique needs of users and fulfills them effectively.
Here are some advantages provided by the tool:
- Multiple Import Options: Users can choose to import multiple PST files to Microsoft 365 or selectively migrate specific data from PST files.
- Folder Exclusion: Users have the option to exclude deleted items or sent items when importing to Office 365.
- Folder Inclusion: If a user wants to bring in a particular folder to Office 365, the tool offers the “Include Folder” option.
Additionally, the import tool:
- Doesn’t require expertise in PowerShell scripting language, making it user-friendly.
- Is accessible worldwide, without any geographical restrictions.
- Offers an incremental import option, ensuring that only new items are migrated in subsequent attempts, avoiding duplicate files.
- Allows users to import Outlook files to Office 365 shared mailboxes.
- Enables the transfer of contacts, calendars, tasks, and emails seamlessly.
Now, let’s understand how the tool works.
Procedure to Import Outlook Folders to Office 365 Using the Professional Tool
You are just five steps away from importing your PST files to Office 365.
Step 1. Download the Import Tool and launch it on your desktop. Provide the necessary login details.
[Note: If you wish to import data in bulk, click on the “Is Office 365 Admin” checkbox, located at the top left of your screen.]
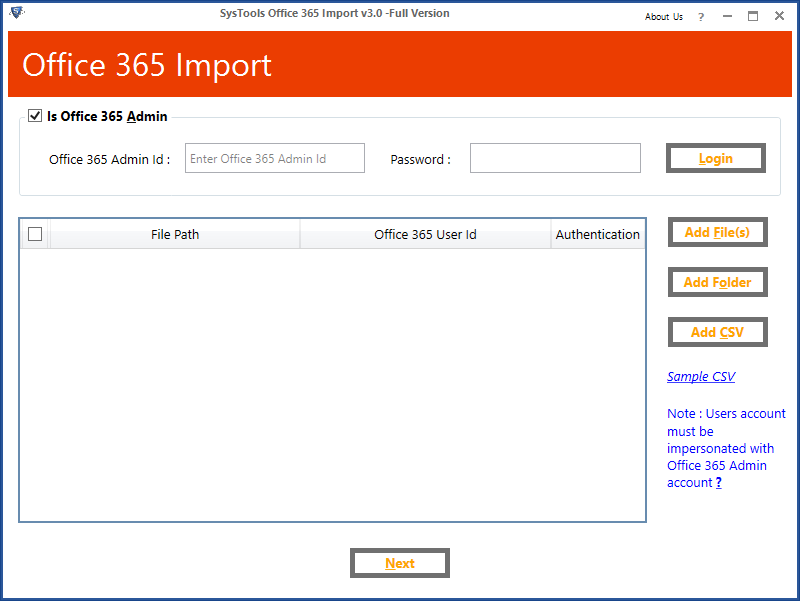
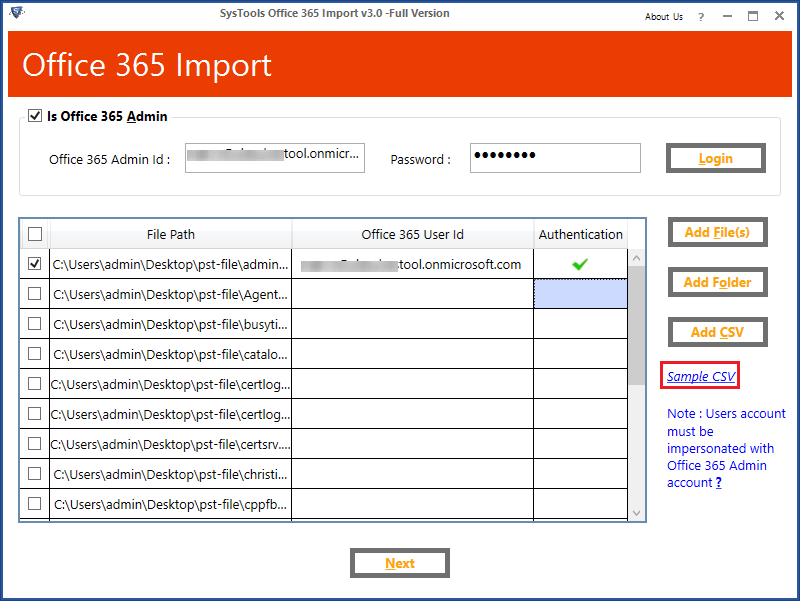
Step 2. Choose one option among Add File, Add Folder, or Add CSV to select the PST files for migration to Office 365.
Step 3. Map the PST file path with the destination Office 365 user ID.
Step 4. Select the desired categories, such as emails, calendars, tasks, and contacts, by ticking the respective checkboxes based on your requirements.
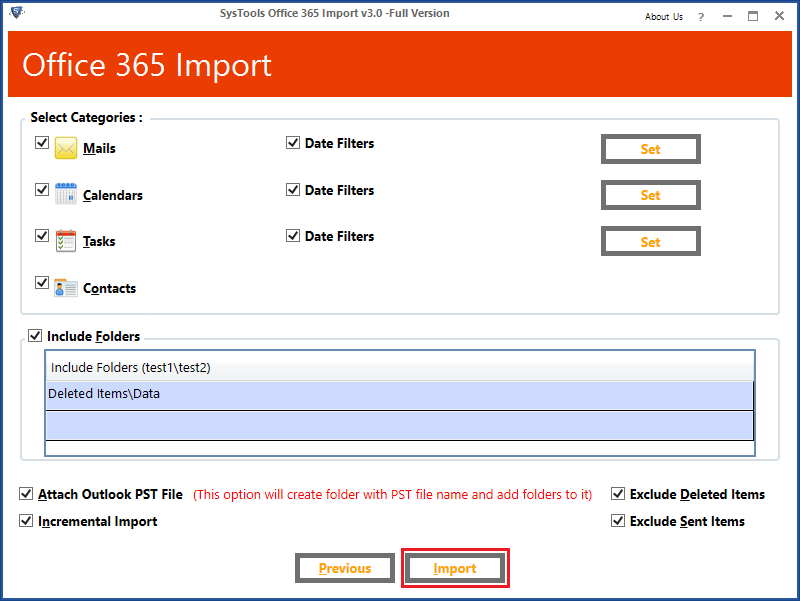
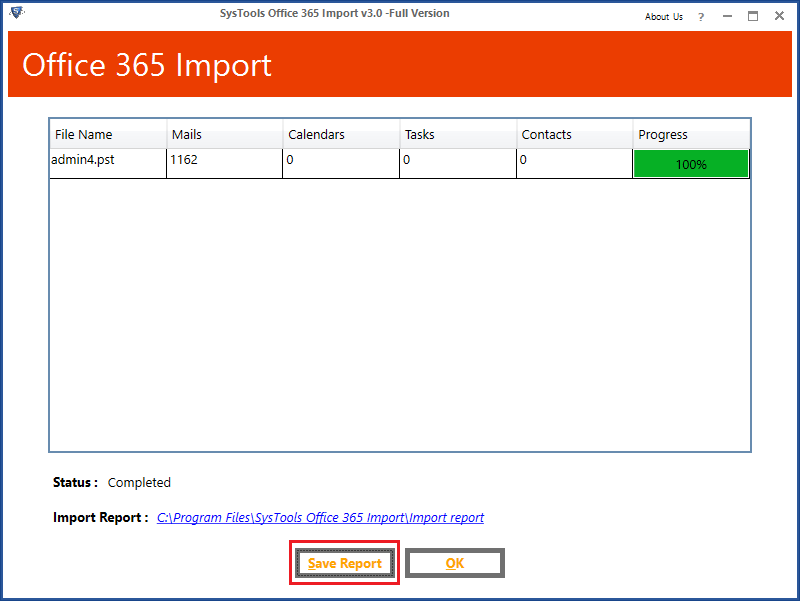
Step 5. Choose additional checkboxes, such as “Include Folders” and “Incremental Import,” as per your preferences. Finally, click the Import button to import Outlook folders to Office 365.
In Conclusion
When it comes to importing Outlook folders to Office 365, users who rely on manual methods face numerous challenges due to their limitations. That is why most IT experts recommend using the above-mentioned tool to import PST to Exchange Online. This software provides a comprehensive and automated process, making it the ideal choice among the available methods.