Copy Document Library from One Site to Another Using 5 Different Ways


SharePoint Online is a highly preferred cloud-based collaboration platform that permits organizations to store, organize, and share information among users. One of the essential features of SharePoint Online is Document Libraries which are a collection of files and folders to be accessed by users having certain permissions. However, there are times when users want to copy document library from one Site to another in SharePoint Online.
This could be due to several reasons like moving to a new SharePoint site, re-structuring the organization, migrating SharePoint Online to another tenant, merging multiple SharePoint Sites, etc. If you also have one such scenario and want to know a step-by-step process for the same, then read this article. Here, we have discussed four ways to copy Document Library from One Site to Another.
Table of Content
- Methods to Copy Document Library to another SharePoint Site
- Method 1. Use “Save As” or “Download” and “Upload”
- Method 2. Using SharePoint Online Modern Experience
- Method 3. Copy Document Library from One Site to Another via Classic Experience
- Method 4. PowerShell Script to Copy Document Library from One Site to Another
- Method 5. Automated Tool to Copy Document Library to another Site in SharePoint Online
- Conclusion
- FAQs
Methods to Copy Document Library to another SharePoint Site
There are a few ways that you can use to perform this task, primarily using built-in SharePoint features or you can use the professional software solution tools. Here are some methods you can consider:
Method 1. Use “Save As” or “Download” and “Upload”
- Step 1. Open the source document library.
- Step 2. Select the files or folders you want to copy.
- Step 3. Use the “Download” or “Save As” option to save these files/folders locally.
- Step 4. Navigate to the destination SharePoint site and library.
- Step 5. Upload the saved files/folders.
Method 2. Using SharePoint Online Modern Experience
The SharePoint Online modern experience provides quite a simple and user-friendly approach to copying Document Library data. The steps are as follows:
- Go to the Document Library of the source Site from where you want to copy the contents.
- Open that library and click on the Gear icon in the top-right corner.
- Choose the Site Contents option from the dropdown menu.
- Click on the 3 dots adjacent to the Document Library that you want to copy from one Site to another.
- Now, a “Copy to” dialog box will appear where you need to enter the Site URL where you want to copy the document.
- Choose the Document Library in the destination Site and click the “Copy” button.
The aforementioned procedure is one of the simplest ways to copy a document library to another SharePoint site. However, you cannot rely on this process entirely as it is not a feasible solution for large Document Libraries.
Method 3. Copy Document Library from One Site to Another via Classic Experience
If you are using the Classic experience, you must use the “Open with Explorer” option. The steps to transfer to the library are as described below:
- Go to the source Site that has a Document Library to copy data from.
- Open Document Library and click on the “Library” tab.
- Click on the “Open with Explorer” option.
- Under the Windows Explorer window, paste the files and folders that you copied from the Source library.
- Finally, wait for the files to upload and sync.
You can consider this method to copy document library to another SharePoint site if you have large-size document libraries to be transferred. However, you need to have some technical expertise to get the job done.
Method 4. PowerShell Script to Copy Document Library from One Site to Another
Another way of copying Document Library data to some other SharePoint site is by using PowerShell commands.
The step-by-step process for the same is as follows:
Launch PowerShell on your system and establish the connection with the SharePoint Online site. To do the same, run the following command:
Connect-PnPOnline -Url <SiteURL> -Credentials (Get-Credential)
In the above command, enter the URL of your SharePoint Site in place of the SiteURL parameter.
Once the site is connected, the next step is to download the Document Library to a local folder. To do that, run the following command:
Export-PnPList -Identity <LibraryName> -Path -Force
Here, replace <LibraryName> with the name of the Document Library from which you want to export your data. Additionally, enter the path of the local folder in <BackupPath> field.
Now to copy Document Library from one Site to another, use the below command to import the Document Library to the destination Site.
Import-PnPList -Path <BackupPath> -DestinationUrl <DestinationSiteUrl> -Force
In the above command, replace <BackupPath> parameter with the local path where you exported the Document Library of the source Site. Moreover, you need to replace <DestinationSiteUrl> parameter with the Site URL of the destination site.
Once you run the above command, you need to wait until the copy process is completed. Once completed, you will be able to access the data on the destination SharePoint site.
Method 5. Automated Tool to Copy Document Library to another Site in SharePoint Online
Considering the significance of data stored in your Document Library, it might be risky to move your data using the aforementioned procedures. Moreover, feasibility is another factor where many users look for an automated solution in place of these lengthy and time-consuming manual procedures. Thus, a need for a trusted and reliable solution arises and one such solution is SharePoint Online Migration Tool.
This is one of the most recommended tools by experts when it comes to migrating Document Library and Generic Lists from one Site to another. If you have any data to be migrated/copied from one Document Library to another Site, then you must try this application once. The simple user interface and advanced algorithms make the entire job effortless.
The integrated dashboard within the tool also helps users in tracking the real-time progress of the process. Moreover, there is an option of Delta Migration to copy only newly received items in the Document Library. You can also migrate SharePoint list to another site using this solution.
Complete Software Steps to Copy Document Library from One Site to Another
Step 1. Begin by installing and launching the tool. Opt for Office 365 as both the Source and Destination.
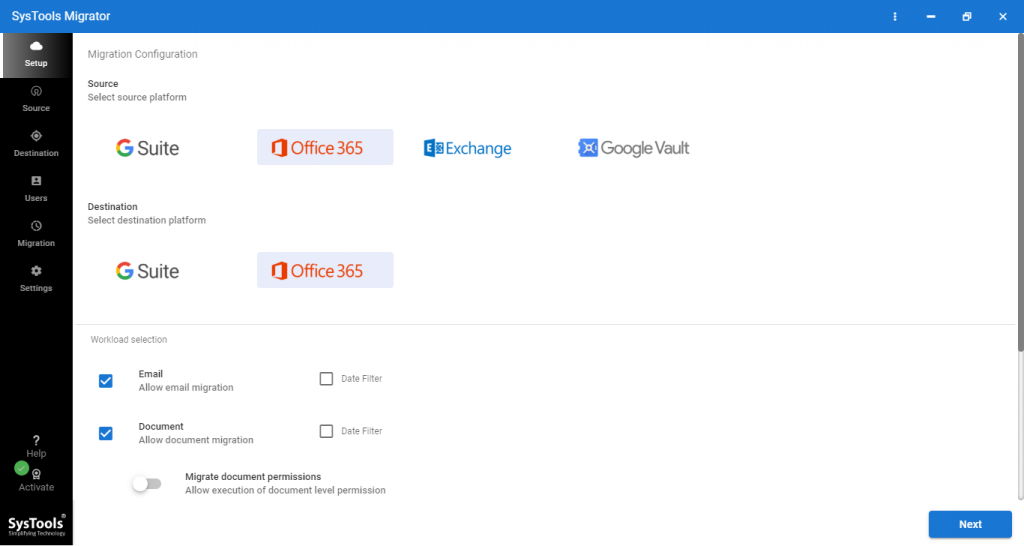
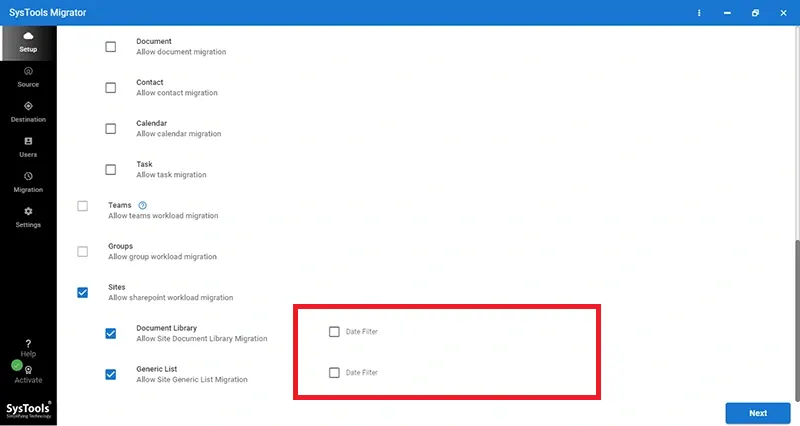
Step 2. Within the workload section, uncheck all boxes except for the Sites option. Proceed to enable necessary settings under Sites and implement the Date Filter.
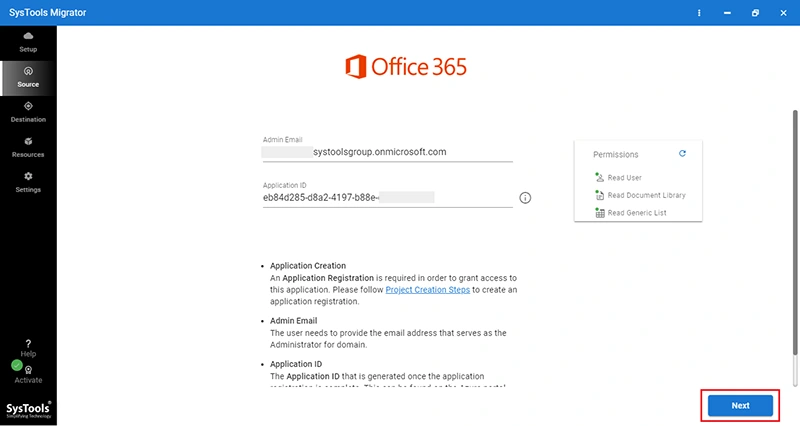
Step 3. Navigate to the Source tab and input the Admin Email and Application ID. Validate the details by clicking on the Validate button and proceed to the next step.
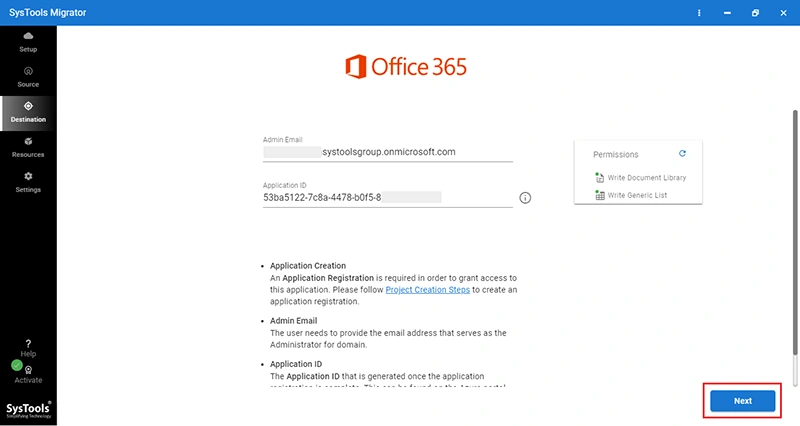
Step 4. Similarly, in the destination window, provide the Admin Email and Application ID. Validate the information and proceed to the next step.
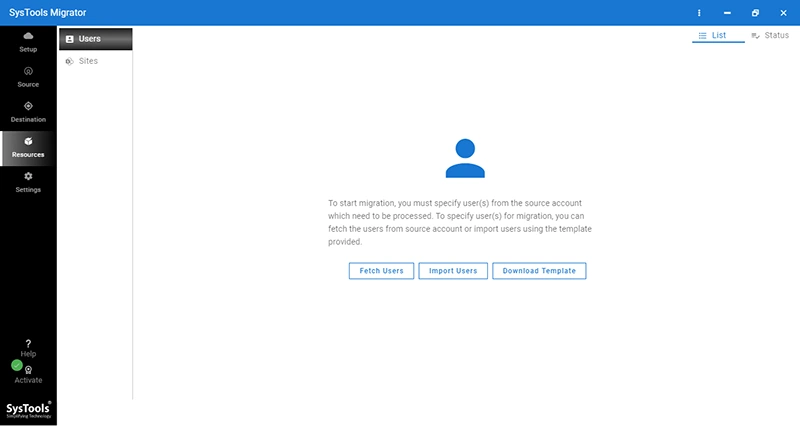
Step 5. Now, initiate the user import process by utilizing the Fetch Users, Import Users, and Download templates functions.
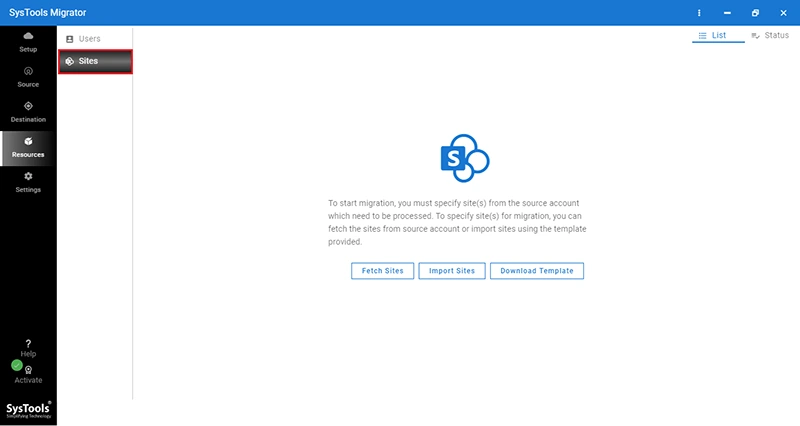
Step 6. Move to the Sites tab and load the sites for migration using available options like Fetch Sites, Import Sites, or Download Template.
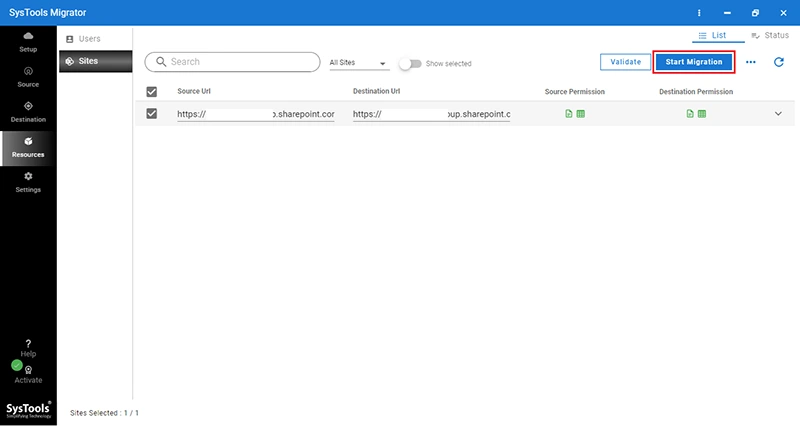
Step 7. Once the site validation is complete, initiate the migration by clicking on the Start Migration button.
Conclusion
In conclusion, copying Document Library from one Site to another is a simple process if you choose the right procedure. In the above article, we have discussed four ways to transfer Document Library i.e. via modern experience, classic experience, PowerShell commands, and a professional solution. If you have a small amount of data and have the required expertise, then you can use the manual procedures. However, going with the automated solution is the best choice as suggested by experts and administrators.
Read More: Get a Quick Guide for Merging Two SharePoint Sites into One
FAQs for Migrating Document Library to another SharePoint Site
Q1. How do I move the document library to a new site?
A few ways are using which you can perform this task, follow this guide and you will get the top 5 ways to perform the same. Using Download and Upload, Online Experience, via Classic Experience, using PowerShell and the mentioned software solution.
Q2. How do I enable cross-site copying in SharePoint?
There are two ways using which you can easily enable cross-site copying these include, Using the SharePoint Admin Center and PowerShell. Let’s discuss each of them:
Using the SharePoint Admin Center:
- Step 1. Go to the SharePoint Admin Center in Office 365.
- Step 2. Click on Settings in the left-hand navigation pane.
- Step 3. Scroll down to the Site Collection Features section.
- Step 4. Toggle the option for Cross-Site Copying to On.
Using the PowerShell Scripts:
- Step 1. Open PowerShell and connect to SharePoint Online using the Connect-SPOService cmdlet.
- Step 2. Use the Set-SPOTenant cmdlet to enable cross-site copying.
For Example:
# Connect to SharePoint Online
Connect-SPOService -Url https://yourtenant-admin.sharepoint.com

# Enable cross-site copying
Set-SPOTenant -AllowCrossSiteCopying $true
Q3. How do I share files between SharePoint sites?
You can follow the below steps to share files between SharePoint sites:
Using SharePoint UI:
- Step 1. Navigate to the document library containing the file you want to share.
- Step 2. Select the file, click on the ellipsis (…), and choose Copy to or Move to.
- Step 3. Select the destination site and document library where you want to copy or move the file.
- Step 4. Click Copy here or Move here to complete the process.
Using OneDrive Sync Client:
- Step 1. Sync both the source and destination document libraries to your local machine using OneDrive.
- Step 2. Drag and drop files from the source library folder to the destination library folder on your local machine. The changes will sync back to SharePoint.
Q4. How do I sync two SharePoint libraries?
You can use these three ways to sync two SharePoint libraries:
1. OneDrive Sync Client:
Sync both libraries locally, then copy files between them.
2. Power Automate:
Create a flow to copy files based on triggers.
3. Using PowerShell:
Connect-SPOService -Url https://yourtenant-admin.sharepoint.com

Copy-SPOFile -SourceUrl https://yourtenant.sharepoint.com/sites/source/Shared%20Documents/file.docx -DestinationUrl https://yourtenant.sharepoint.com/sites/destination/Shared%20Documents/file.docx
Q5. Which is the best migration approach when we want quick and error-free migration?
A. Considering your priorities, we would always recommend you go with the above-stated professional solution to migrate SharePoint document library to another site. The software offers multiple advanced features and supports batch migration making the overall process a breeze. You get all these features without worrying about your data’s security and integrity.
Q6. Will there be any impact on the metadata after copying document library to another SharePoint site?
A. No, you don’t need to worry about the metadata of your crucial data. The software makes sure that all your data is transferred while making sure that no changes are made to the metadata.
Q7. What will be the impact on the permissions of document libraries after migrating them to another site?
A. There will be no impact on the permissions while you copy Document Library to another SharePoint site. Moreover, the advanced application supports permissions mapping with Source and Destination users. Thus, it makes document library migration simple for administrators.
Q8. Will there be any downtime during the migration or I can use my data in document library?
A. No, one of the best features of this Document Library Migration utility is that it doesn’t bring any downtime during the migration process. This means you can access your SharePoint site data without any issues while the data is being migrated.