How to Combine Two Office 365 Tenants After Merger – A Complete Guide


Undoubtedly, there are several types of cloud-based email services available today, but Office 365 is the most prominent among all. In the era of cloud computing, web-based applications are most important in the IT field. At certain times, admins are required to merge two Office 365 tenants for more unified yet effective business communications and collaborations. However, they face many challenges while performing the same. Therefore, in this write-up, we are going to discuss a step-by-step procedure to combine two Office 365 tenants in an absolute manner.
Table of Content
Benefits of Combining Two Office 365 Tenants
- Easy Management for Admins – When we combine two or more Office 365 tenants it allows IT or Office 365 admins to easily monitor and manage all the resources from a unified location. These include users, groups, storage quotas, special permissions, and other resources.
- Enhances Collaboration – When we have multiple o365 tenants then the users from each tenant act as guest users to others. Which makes it complex to streamline data transfer and permission management. This eventually affects the overall collaboration, to overcome this combining them into a single tenant eliminates the hurdles of guest users since all users are now associated with a single tenant.
- Right Usage of Resources – In a single tenant it becomes a breeze operation to manage resources efficiently, admins can better use available resources such as email, storage, and other required permissions. This eventually optimizes the overall cost management and improves ROI.c
- Systematic and Regular Security Implementation – Consolidating multiple tenants into one tenant leads to improved security implementation by allowing admins to enforce and deploy consistent security policies among all users and resources. These include MFA and retention policies for accounts, antiphishing, antispam, antimalware for email, etc.
- Cost Optimization – Combining multiple tenants also leads to overall cost reduction as multiple tenants have their different plans and removing them reduces the cost of separate plans accordingly.
Different Techniques to Merge / Combine Two Office 365 Tenants
Microsoft does not provide a native, supported method to merge two separate Office 365 tenants. Moreover, you can not directly merge or consolidate multiple Office 365 tenants, rather you need to perform a complex migration process to migrate the data to the destination tenant. Since there is no direct manual method officially confirmed by Microsoft. To achieve this the admins need to perform Office 365 tenant-to-tenant migration. Hence, let us proceed with the right approach to perform this task.
Best Practices Before Getting Into Migration
Before discussing the command to integrate Office 365 tenants, it is important to keep some important things in mind as listed below:
Client considerations
- For Outlook 2010/ 2013: Remove the account of MS Outlook.
- For Outlook 2007/ 2010: During restarting, the email client will be configured by auto-discover and building the OST file once again.
- For Lync Client: After the merge is done, you can add all contacts.
Preparation & Licensing of Tenant
- There is a need to increase licenses in the targeted tenant of Office 365. This is necessary so that the mailbox of the source tenant to be consolidated into the targeted tenant.
- Create an Administrator account in both target and source tenants. It is very useful in merging two Office 365 tenants.
End-user interactions
For the interactions of merging with users in the organization, users must prepare themselves using a method described below:
- Make a plan of interaction and start the merging process of the two domains and the service modifications.
- Once the consolidation process is done, the nickname cache must be cleared in the MS Outlook application.
- Inform the user about the entire process to connect to the Outlook Web App (OWA) with the help of fresh login details in case of any issue after the merging process.
Preparation & Pre-migration Actions: 3 days before the Merger
Preparation of Domain
- Users have to start the verification of the domain, on the tenant that is targeted for the email domain of the source tenant.
- Another thing that needs to be accomplished is that in the targeted Office 365 admin center, add the source domain and in DNS, create a TXT record for verification
Note: The domain still needs to be used in another domain. Therefore the verification will fail.
- After all these steps, a user allows the DNS record time to circulate. This whole process can take approximately 72 hours.
Scheduling of Merging
- Users have to generate the master list of user mailboxes that are required to combine.
- After this step, you can create the mailbox mapping.
Mail Exchanger (MX) Record Time to Live Test & Disable Directory Sync in Source Domain
Target tenant preparation
Target tenant preparation involves the verification of the source tenant in the target tenant. End-user needs patients at least 1 hour after the removal of the domain from the existing domain.
- Using AD-FS, users must have to configure the new domain in target for AD FS.
- Start the activation of a target domain and allot licenses to a new user account.
- Set the source as a primary email address.
- Place the password on the domain mailbox, which is targeted when users are not accessing the AD FS or password synchronization feature.
Source tenant preparation
Users can remove the primary email domain from all objects available in the source tenant, before integrating it into the target tenant
- Now, in setting up the public website of SharePoint Online, place the website URL again to the initial domain.
- Delete the Lync licenses in the source domain using the Lync admin portal.
- By default, set the email ID on the source mailbox of the initial domain once again and reset all email addresses on Resources, Rooms, and Distribution Lists to the initial domain in the source tenant.
After that, run the PowerShell scripts for the merge process:
Reset Office 365 bulk password
- First, generate the CSV file with the name password.csv.
- Now, put in the “upn” & “new password” columns in the created file
- Run the below command of PowerShell:
Import-Csv password.csv|%{Set-MsolUserPassword –userPrincipalName $_.upn -NewPassword $_.newpassword -ForceChangePassword $false}
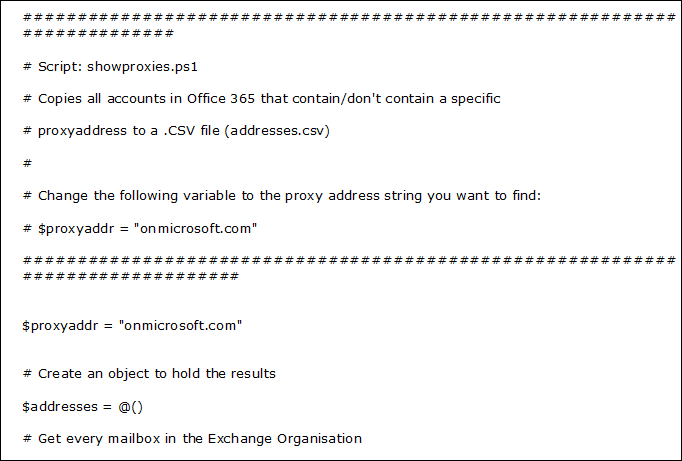
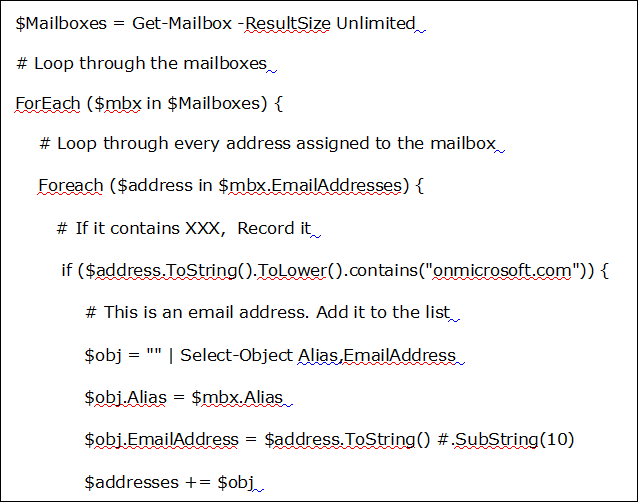
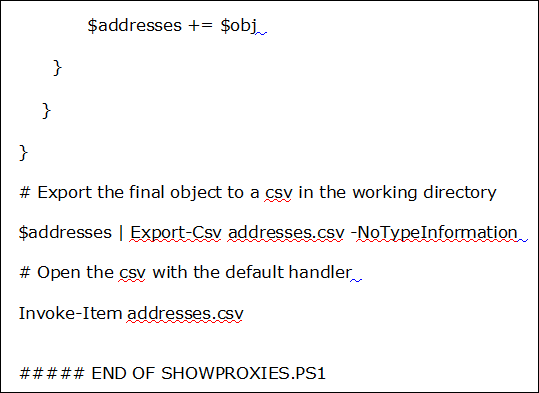
Print MS Office 365 account with a specific address of proxy into CSV file
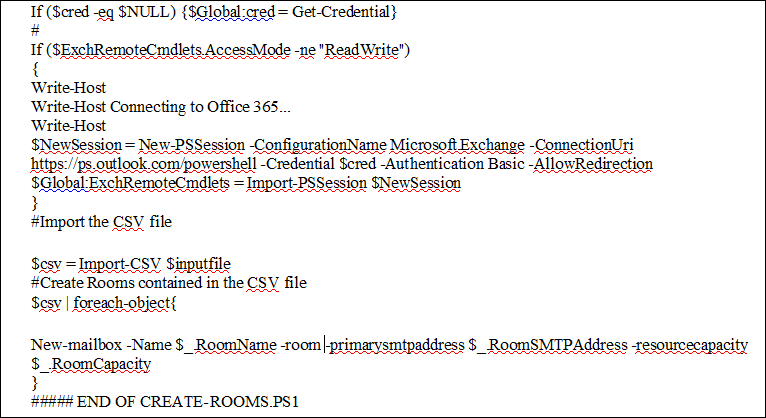
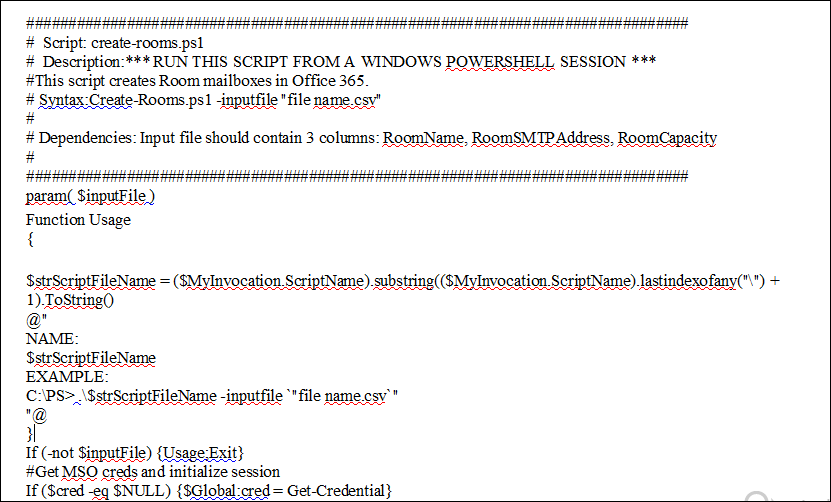
Bulk Create Room Mailboxes in Office 365
Remove Secondary Email Addresses from Mailboxes in Batch

Also Read: How to Forward Emails to Multiple Accounts Office 365?
Use a Professional Tool to Combine Two Office 365 Tenants After Merger
Now, that we are ready, to do this task we can use Office 365 Tenant Migration Tool. It is one of the best applications that help combine two Office 365 tenants without hassle. With the help of this tool, users can merge Office 365 tenants, accounts, and domain users’ data. This application supports all Windows operating systems and also keeps all data intact.
Software Working Steps to Merge Two Office 365 Accounts
Step 1. Download and run the tool mentioned above on your local computer. Select Office 365 as the source and destination migration platform.
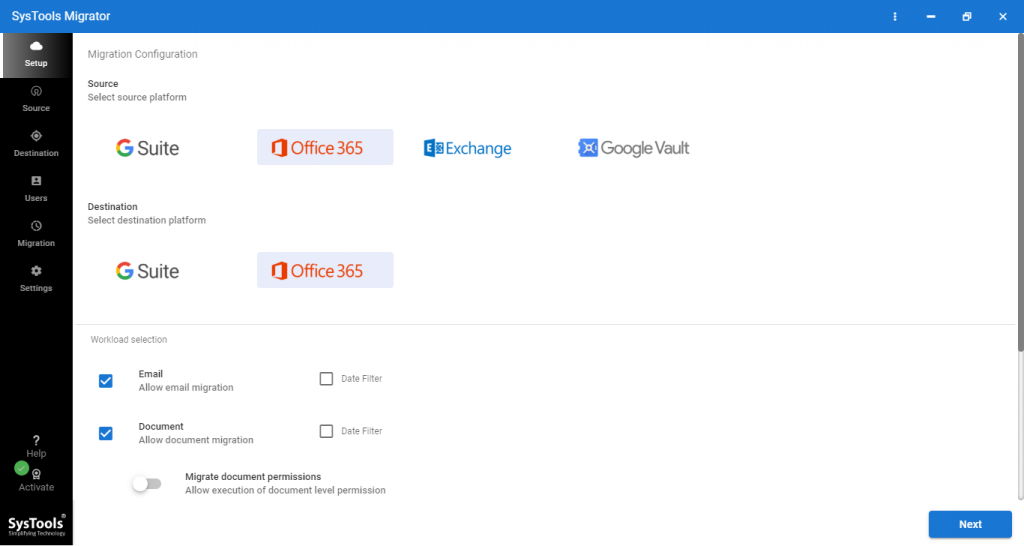
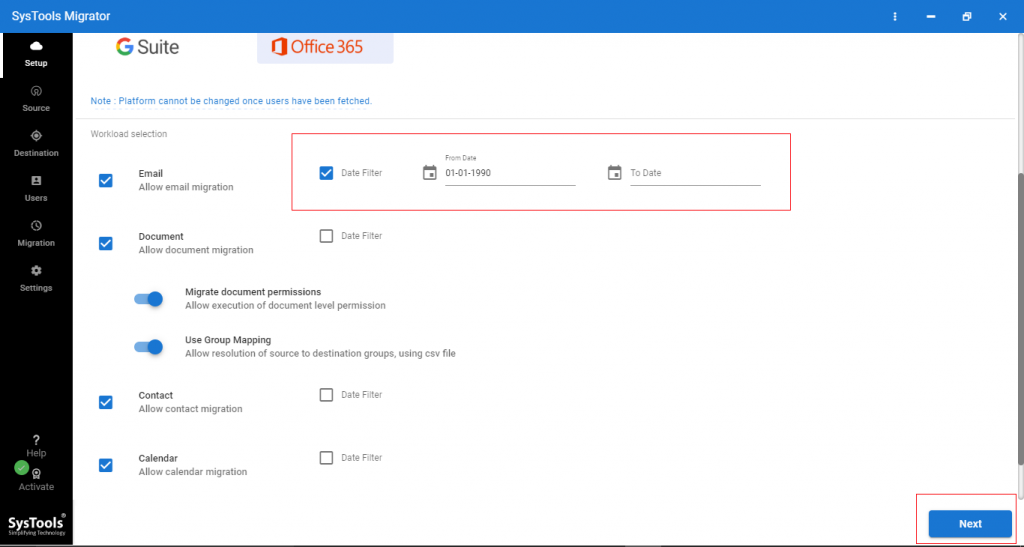
Step 2. Now enable the required workload from the given options such as emails, contacts, calendars, and tasks. Also, apply the date filter if required. Click on the next button.
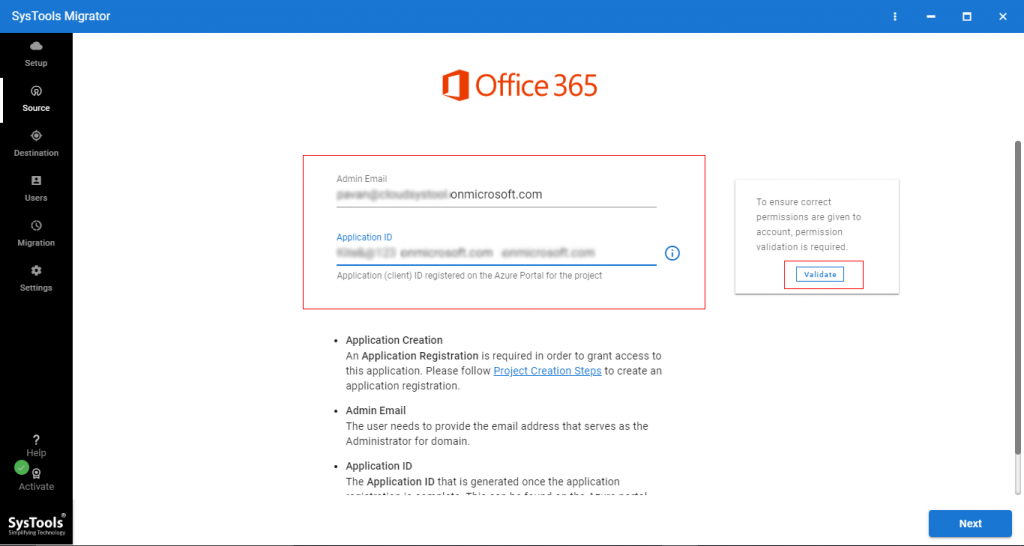
Step 3. Provide source and destination Admin Email and Application ID and validate the required permissions. Then click on next.
Step 4. Select the required users from the given list and validate the required permissions.
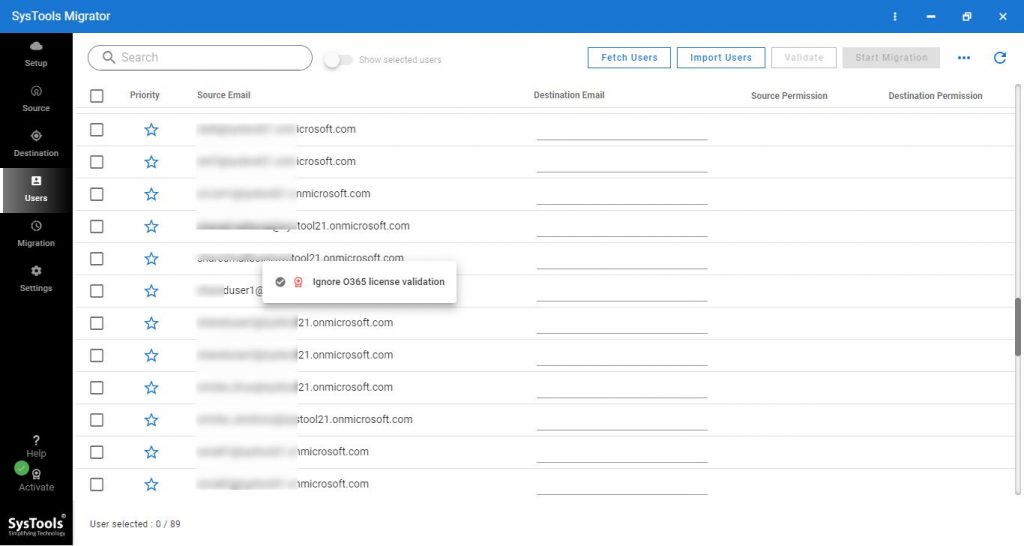
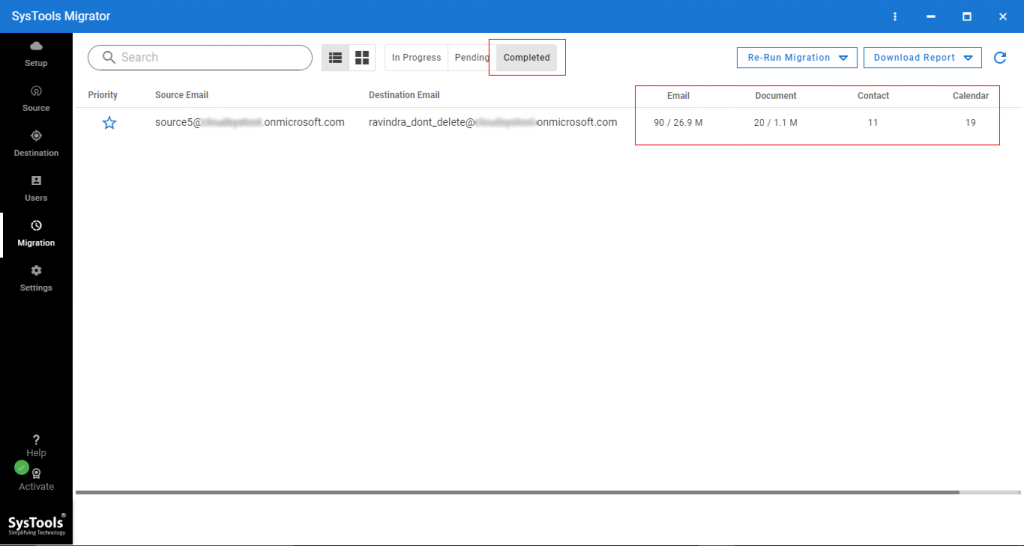
Step 5. Once all the required permissions get validated then click on the start migration button to combine two Office 365 tenants safely.
Also Read: How to Export Office 365 Mailboxes to PST using eDiscovery – Free Tutorial
Why Should You Choose Tool Over Manual Method?
There are several benefits of using the software over a manual approach some of the note-worthy are listed below:
- Simplifies the migration process with user-friendly interfaces and step-by-step wizards.
- Requires less technical expertise compared to manual methods.
- Automates provisioning, data transfer, and configuration adjustments.
- Ensures consistency and accuracy throughout the migration.
- Handles large volumes of data securely, maintaining data integrity.
- Offers options to schedule migrations during off-peak hours, minimizing downtime.
- Can perform phased migrations to reduce disruption to users and business operations.
- Provides robust customer support and documentation.
- Assists in troubleshooting issues and optimizing migration strategy.
- Accommodates migrations of varying sizes and complexities.
- Manages multiple aspects of migration such as mailboxes, calendars, contacts, etc.
Let’s Wrap Up
Office 365 is the best cloud-based suite that comes with countless advanced features. At certain times, some users or organizations want to combine two Office 365 tenants. For this, they start searching for a trustworthy solution, as data security is so important. Therefore, in this blog, we have discussed trusted solutions for merging two tenants of the Office 365 suite. Users can follow any of the approaches as per their needs.
FAQs
Q. How does the software help in merging two Office 365 tenants?
Since merging in particular is not possible in Microsoft 365 environment. You have to migrate the data to the destination tenant and to do so the software allows you to perform this task in just 5 simple steps.
- Step 1. Install and run the software on your PC.
- Step 2. Select Office 365 as the source and destination.
- Step 3. Choose the required workload and apply the date filter.
- Step 4. Log in with source and destination admin credentials.
- Step 5. Validate the required permissions and click on the start button.
Q. Can you have multiple Office 365 tenants?
Yes, you can have multiple tenants based on your organizational requirements, each of them will act as a dedicated and separate instance of Office 365 services. Businesses often opt for them in situations where they have different subsidiaries, departments, or legally distinct entities. In this case, they use multiple tenants to keep things organized and seamless.
Q. How do I set up multiple tenants in Office 365?
- Step 1. Use Global Administrator credentials to sign in to the Microsoft 365 Admin Center.
- Step 2. Expand Settings and select Org settings.
- Step 3. Go to Organization profile > Multitenant collaboration > Get started.
- Step 4. Select Create a new multitenant organization > Enter name, description, and tenant IDs > Next.
- Step 5. Check Allow users to sync into this tenant and Suppress consent prompts.
Q. Can we use a single domain on two different o365 tenants?
No, you cannot use a single domain on two or more different Office 365 (Microsoft 365) tenants simultaneously. Each domain can only be associated with one Office 365 tenant at a time. Instead, you can use the subdomain and you can create two subdomains and use them in separate tenants. However, you can add up to 900 domains in a single tenant.