Transfer Office 365 Subscription to Another Account or Computer – A Guide to Follow


Are you struggling to move your Office 365 subscription to another account or computer? Whether you’re upgrading devices or consolidating accounts, navigating this process can be daunting. Fear not! This guide outlines the best methods to seamlessly transfer your Office 365 subscription to another computer, account, tenant, user, or email address.
Whether you’re a solo user or managing a team, these steps will ensure you retain access to your Office tools without unnecessary hassle or cost. Let’s dive in and simplify your transition.
Table Of Content
- Scenario 1. How to Transfer Microsoft Office 365 Subscription to Another Computer?
- The Complete Steps to Transfer Microsoft Office 365 Subscription
- Scenario 2. How to Transfer Office 365 Subscription Data to Another Account?
- Detailed Step-by-Step Working to Migrate Office 365 Subscription Account Data
- Conclusion
- FAQs
Scenario 1. How to Transfer Microsoft Office 365 Subscription to Another Computer?
“I just purchased a new computer and on my old one, I had an Office 365 Personal subscription. I do not know how to transfer this subscription to my new computer. If I will uninstall it from the first one then, can I just use the setup once again and install it on another computer? I do not want to pay $100 to buy it again. How can I do this, any suggestions?”
Solution
If you have Office 365 on one of your PCs, however, now you need to move the Office 365 to another PC then, you need to transfer the Office 365 license to another PC. To transfer the Office 365 subscription to another system first, one needs to deactivate Office 365 installation on the current PC and then, download, install, and activate Office 365 on new PC where you want to use Office 365.
Note: Deactivating an Office 365 install does not uninstall the Office nor does it remove Office documents.
The Complete Steps to Transfer Microsoft Office 365 Subscription
Step 1. On a new PC where you need to transfer an Office 365 subscription, open the Office 365 official page. Sign in to your account via the email address that you used while purchasing the Office 365 subscription.

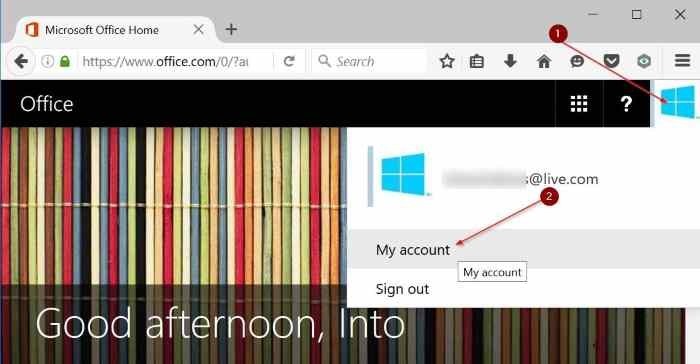
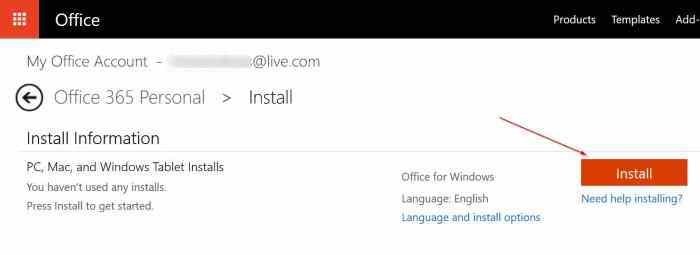
Step 2. Next, on the home page, click on the account user picture at the top right. Click My Account.
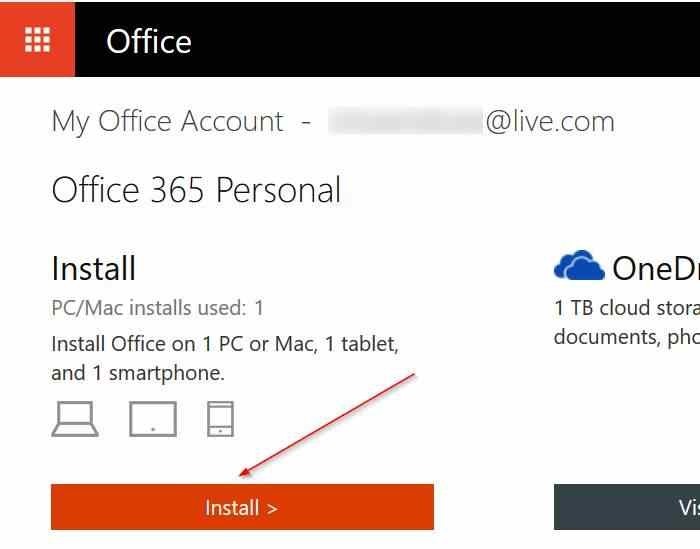
Step 3. Under the Install section, click on the Install button.
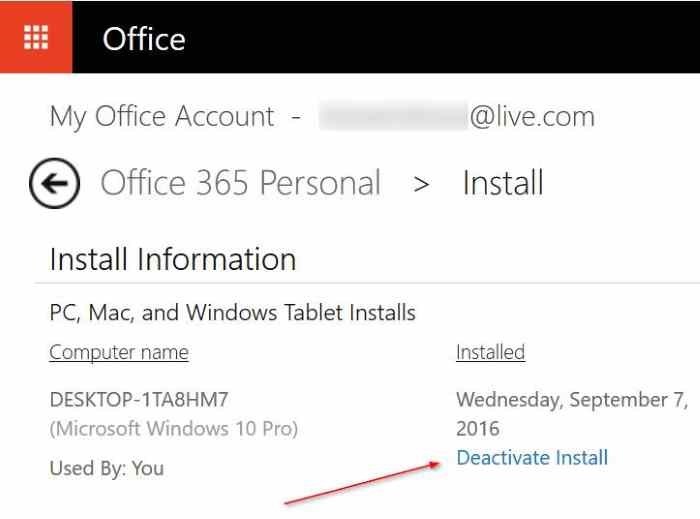
Step 4. In the Install Information subdivision, you can check all PCs and other devices where your O365 is currently installed and activated. Now, to deactivate Office 365 on any of the PC, click Deactivate Install situated next to your PC’s name
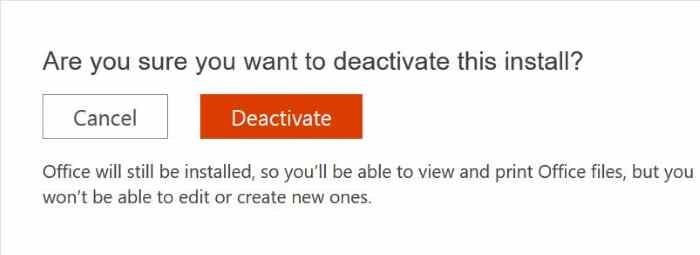
Step 5. Hit the Deactivate button after displaying the confirmation dialog box to deactivate Office 365 on the current PC. After this, you can uninstall O365 from your current PC
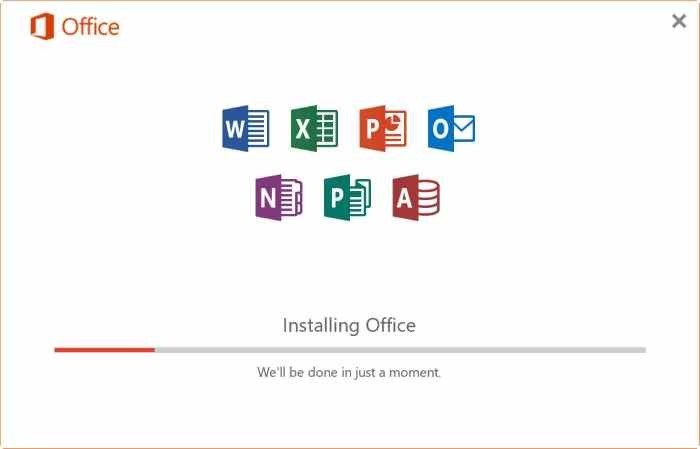
Step 6. Now, click on the Install button that is placed on the same wizard for downloading O365 setup. Then, run the setup file to start downloading the files that are required for installation. Office 365 Setup will be automatically installed on your PC
Step 7. Eventually, after installing Office 365, open Word or any other Office service. Now, you will be asked to enter your email address to activate the copy of O365. Here, enter the email address that you previously used to purchase Office 365 subscription. That’s it!
Note: After installing Office 365 on the new computer, you will need to sign in with the same Microsoft account credentials used to purchase the subscription to activate it.
Scenario 2. How to Transfer Office 365 Subscription Data to Another Account?
Let’s discuss the user query below –
“I redeemed my O365 license. While doing that (apparently), I was logged in on my browser with the wrong Microsoft account. Now, the subscription is activated on the wrong Microsoft account. I want to transfer all the data from this account to another account (the one which I use regularly). Is it possible to move Office 365 subscription data from one account and redeem it again? I have tried to transfer Office 365 subscription data to another account but, am unable to do so. How can I make this transfer happen?”
Solution
Sometimes users activate their subscription without realizing that they have been auto-logged in with a wrong account or in which they do not need the subscription. In such conditions, one needs to move their data from one account to another. The Freeviewer’s Microsoft Office 365 Tenant Migration Tool can migrate multiple Office 365 mailboxes to another tenant account/ domain. Using this tool, one can transfer emails, contacts, calendars, and tasks from one Office 365 account to another. It supports various O365 subscription plans to execute the data migration.
Detailed Step-by-Step Working to Migrate Office 365 Subscription Account Data
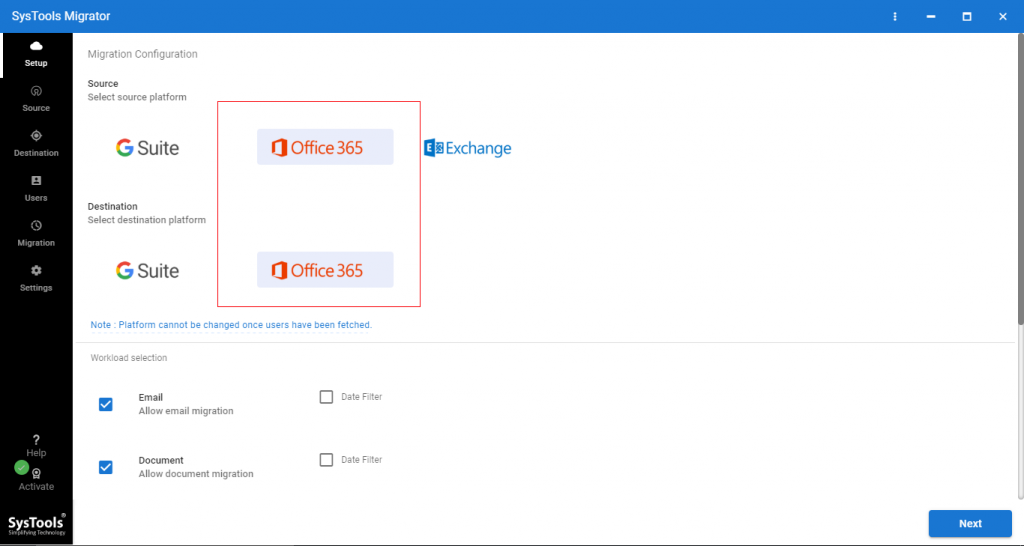
Step 1. First, download and launch the Software and select Office 365 as Source and Destination.
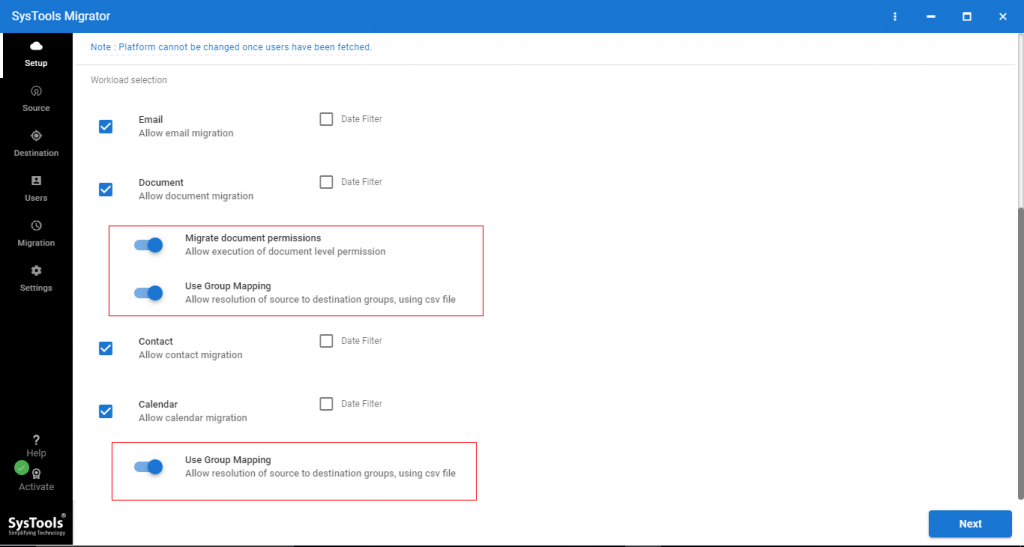
Step 2. Now, select the data that you want to migrate and enable Migrate Document Permission, Use Group Mapping.
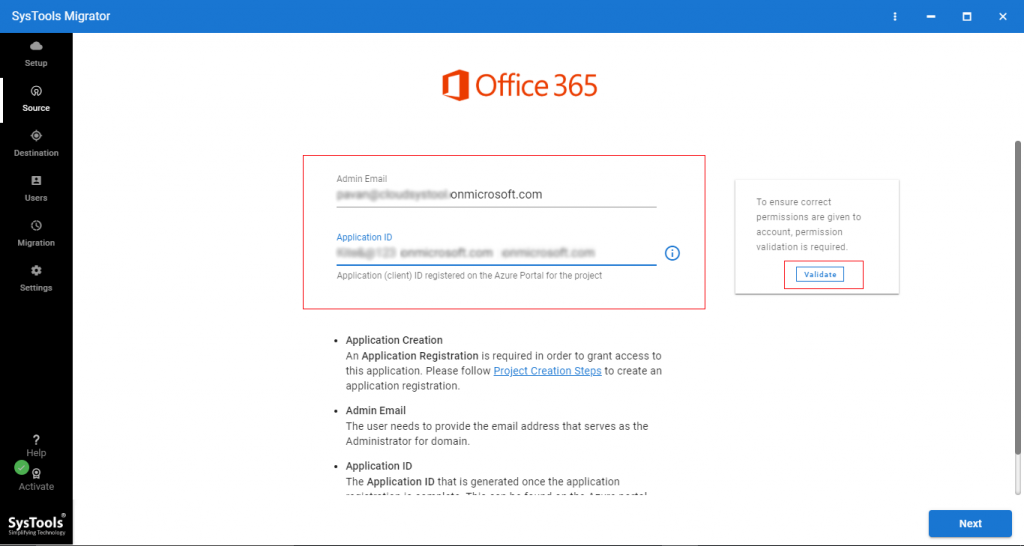
Step 3. Login in source Office 365 with Admin email ID & Application ID. Click on the Validate button to validate permission.
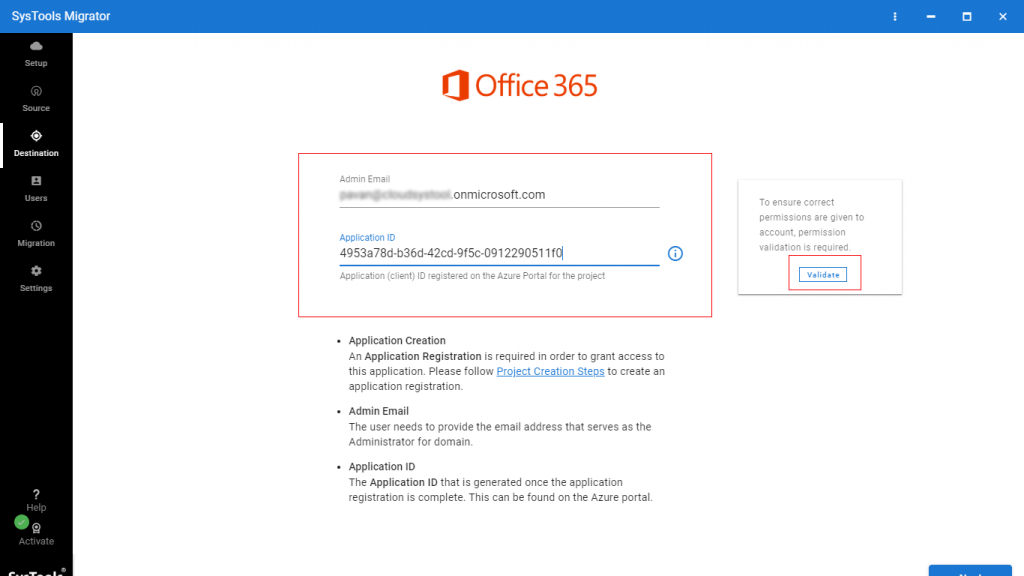
Step 4. Login destination Office 365 (where you want to migrate your subscription).
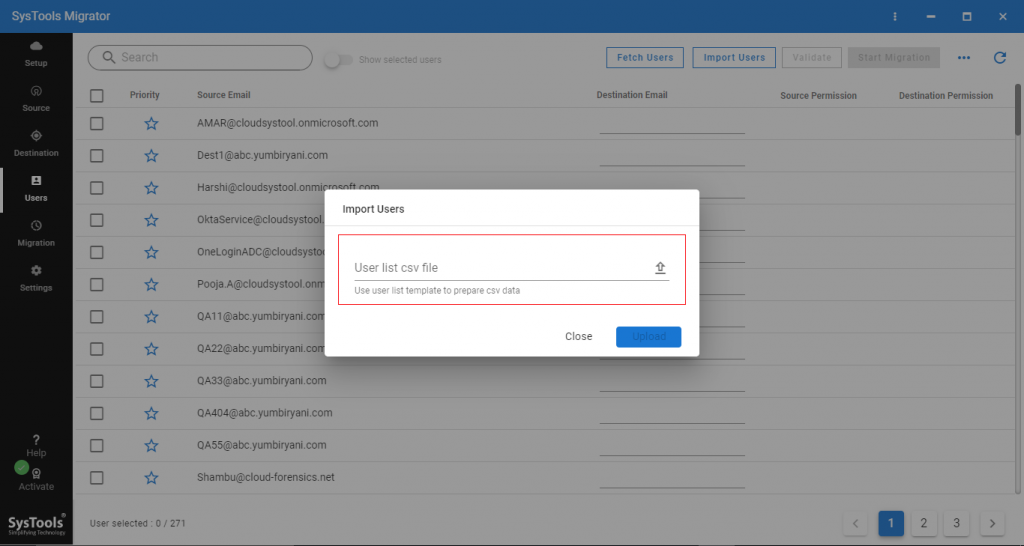
Step 5. Now, import csv file to create mapping source & destination user accounts.
Step 6. Click on the validate button to validate permissions.
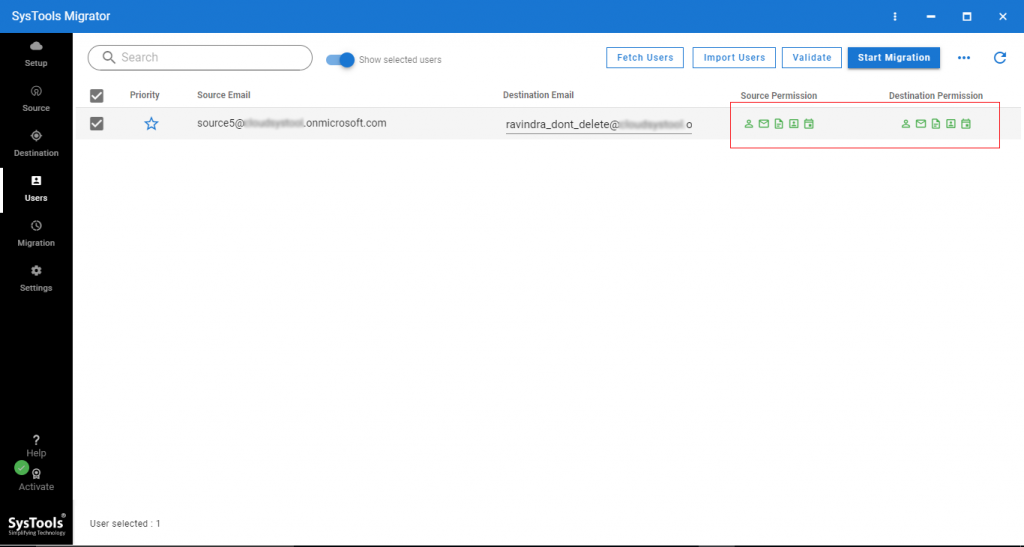
Step 7. Now, click on the Start Migration button to transfer Office 365 subscription data to another account.
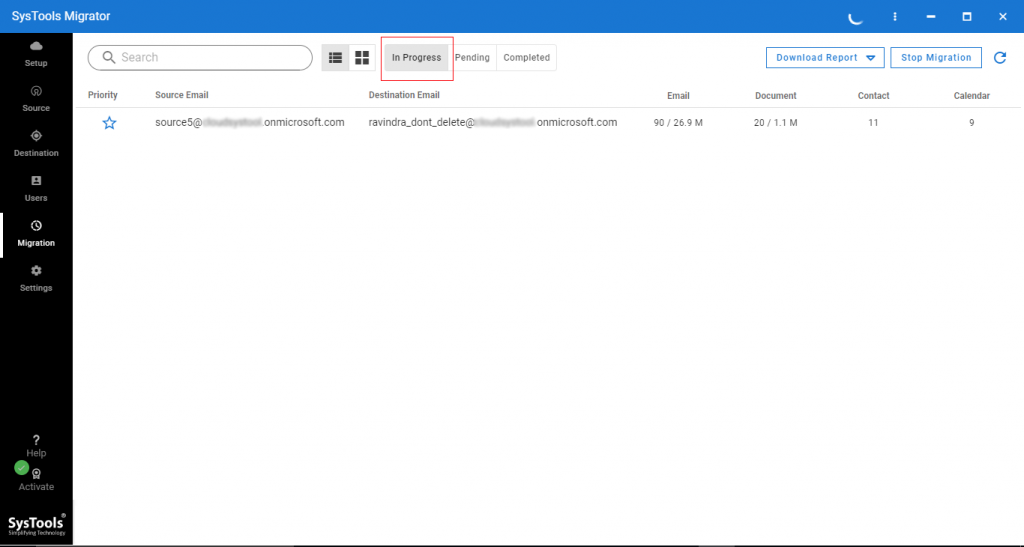
Step 8. After this, log in to another Office 365 account in which you have transferred the mailbox data from the previous account. Now, you can access all your databases from this account.
Also Read: How to Combine Two Office 365 Tenants After Merger?
Conclusion
Office 365 is a product offered by Microsoft that provides an Office suite of applications. There are different plans available for Office 365 and one can install Office on computers tablets, and smartphones according to plans. There are different situations where users may need to transfer their Office 365 subscription to another account or computer. However, doing this is not an easy task and a single misstep may lead to permanent data loss. To simplify this complex task, we have come up with this technical guide. Here, we have disclosed some easy and efficient solutions for the same.
FAQs
Q1. How does the tool help in transferring Office 365 subscription data?
It helps you by providing a streamlined process for migrating various components of Office 365, such as emails, contacts, calendars, and tasks, from one Office 365 account to another. Follow the 5 quick steps to move Office 365 Subscription data to another account.
- Step 1. Install and Run Software on Your PC.
- Step 2. Choose Office 365 as the Source & Destination.
- Step 3. Enable Required Mailbox & Apply Filter.
- Step 4. Login with Office 365 Credentials & Validate.
- Step 5. Create Mapping and Click on the Start Button.
Q2. What should I do if I accidentally activated Office 365 on the wrong Microsoft account?
If you mistakenly activated Office 365 on the wrong Microsoft account, you can transfer data to the correct account using the mentioned tool designed for Office 365. Ensure you have administrative access to both accounts and follow the tool’s instructions for a smooth transfer.
Q3. How do I change my Office 365 license on my computer?
To change your Office 365 license on your computer:
Step 1. Deactivate Current License:
- Open any Office app, and go to File > Account (or Office Account).
- Find Manage Account and click Deactivate next to your current installation.
Step 2. Install and Activate New License:
- Sign in to office.com with the new license’s Microsoft account.
- Download and run the Office installer.
- Sign in during installation to activate the new license.
Step 3. Verify Activation:
- Open any Office app and check under File > Account to confirm the new license is active.