Guide for MS Exchange to Exchange Migration in a Safe Manner


People are getting more & more advanced with the latest technology. Margaret for data migration is growling rapidly as everyone wants to keep their data in the safest place. Hence, users often ask about the best method for MS Exchange to Exchange migration. No doubt Microsoft Exchange is one of the most brilliant business applications in the world. Still, users are stuck with this problem.
Table of Contents
Today in this article, we are going to explore the free method, safe method, their features, drawbacks & much more about the topic. However, we should start with the reasons why users go through such operations. Let’s begin & become a master of such data migration tasks. Users sometime also asks how to export mailboxes using Exmerge in Exchange 2003. Anyway, that’s an old tool. Today all the modern ways are listed.
Why Do Users Migrate Exchange to Exchange Data? Reasons or Needs
Now, users have their own reasons why they need to migrate their data from Exchange Server to Exchange server. Even though it may sound weird to some people but it totally makes sense. Let’s know-how.
- Exchange server has different versions like Exchange 2010, 2013, 2016, & 2019. Users want to upgrade from an older server to the latest one. I hope that now all the pieces of the puzzle are getting into their position.
- When an employee on an old Exchange Server leaves & its data is obe transferred to an employee working on the new Exchange server, users undergo this critical operation.
- There are some scenarios like the uncertainty of the older servers. Who knows when the technical support help stops for the older versions. So, it’s better to make a move now or it’ll be too late.
- Miscellaneous reasons like enhancing emailing environment & communication structure, SHA-2 compliance, multiple language support & enhanced downloading also play an important role in such decisions.
Exchange to Exchange Migration Using Free Manual Solution
If you’re wondering about the methods that can provide you with the solution, then frankly, there are no direct solutions available from Microsoft. However, you can indirectly get the work done using EAC(exchange admin center) or PowerShell. These are free but automated solutions are a much better approach.
To begin with the manual method, follow the steps mentioned below along with the respective images to get an understanding of the manual method in depth. This tool is also suitable if you want to learn how to reduce Exchange EDB size.
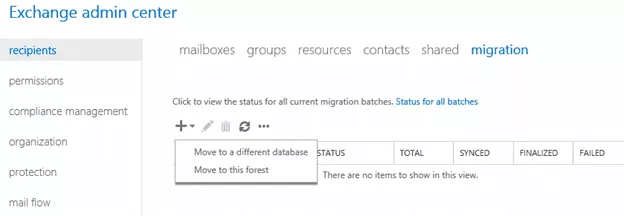
Step-1. Go to Exchange Admin Center & then Sign in with Admin Credentials to migrate exchange to exchange.
-
- Click on the “recipients” button >> migration >> Select “Move to a different database” option.
- Click on “Select the users that you want to move” & Add Users in the select mailbox window.
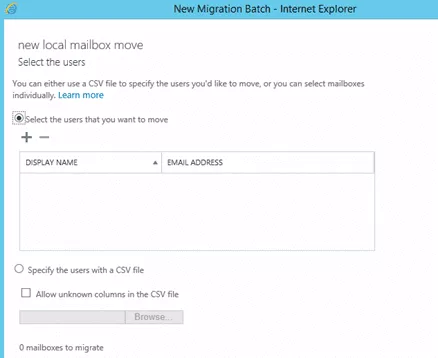
- After adding users, Click on the Next button & then Enter a Name for the operation.
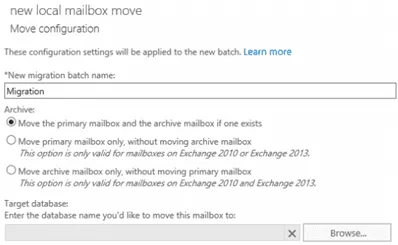
- Click on the Radio button that says “Move the primary mailbox and the archive mailbox if one exists”.
- Click on the “recipients” button >> migration >> Select “Move to a different database” option.
- Click on the Browse button to Select Target Database & Click on Next.
- Enter User Details & Select “Automatically start the batch” to automatically migrate exchange to exchange.
Shortcomings of the Manual method for Exchange to Exchange Migration
There are various loopholes in the manual method that users usually ignore due to the method being free. However. These are the reasons why we say that the manual method isn’t safe or isn’t reliable. Moreover, the manual solution can’t even repair or migrate corrupted files.
- The manual fails to handle bulk data migration. Here, it totally collapses & hangs. Nothing can make the user experience worse than this except one thing that’s next.
- Data Safety is another crucial element of the data migration operation. It’s quite dangerous to opt for the manual method as users can end up with corrupted files or even losing vital files while MS Exchange to Exchange migration.
- Now, time is another factor that organizations are always short of. Conventional solutions are slow & reduce efficiency which no organization appreciates.
- Last but not least, this method is quite confusing also. There are minor changes in the operation as per the users’ current Exchange server. New users can easily get confused.
Automated Method for Solving User Querry with 360° Safety
The only reliable solution we are left with is the modern approach or what we call the automated method. This method is so popular because of the security it provides to the data along with the simplified GUI. This solution is enriched with state-of-the-art algorithms & AI technology. Download the Most Trusted FreeViewer Exchange Mailbox Recovery Software to get better results in MS Exchange to Exchange migration.
This tool can help users recover purged, deleted & corrupted data & migrates them to their desired location with ease.
Downloading the tool is completely free & you can get access to the demo versions where you can experience all the features but with a limited amount of data to be migrated. However, the paid version unlocks everything & then the sky is your limit. All the exciting features can help new users that we are going to discuss next. However, first, we should start with the solution.
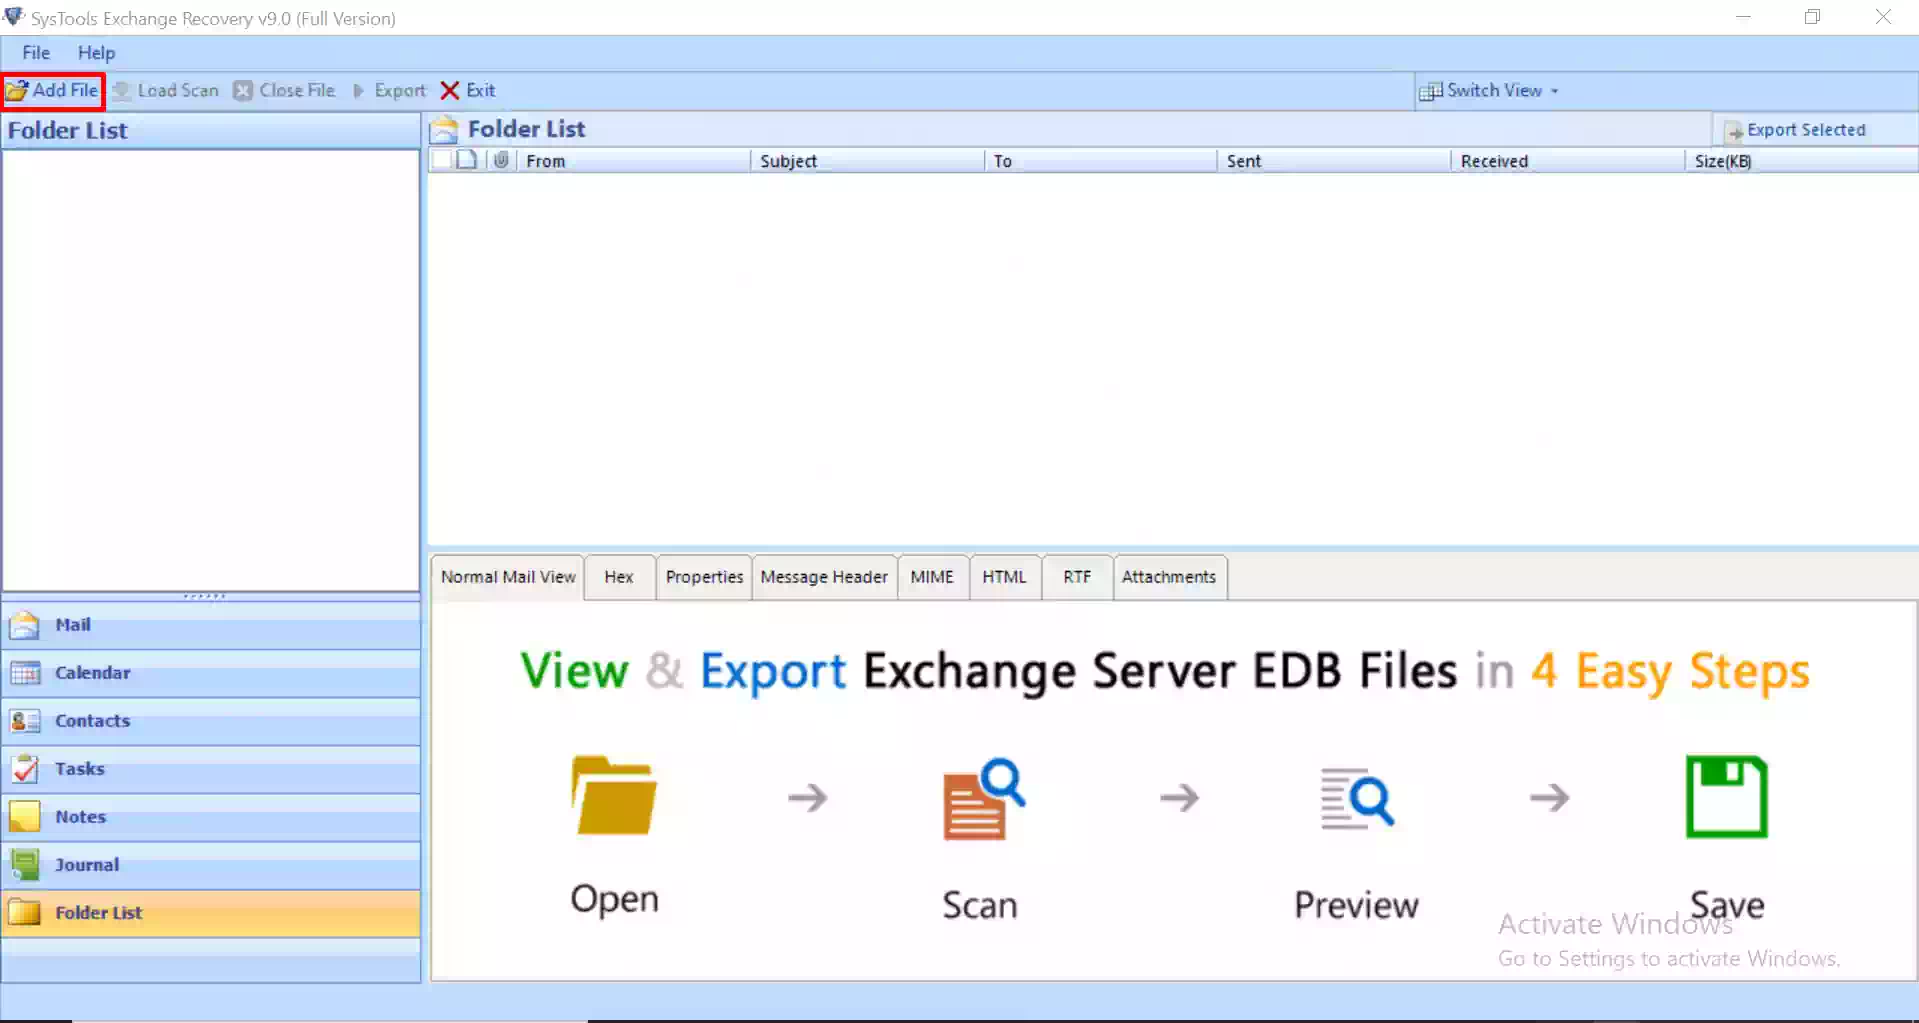
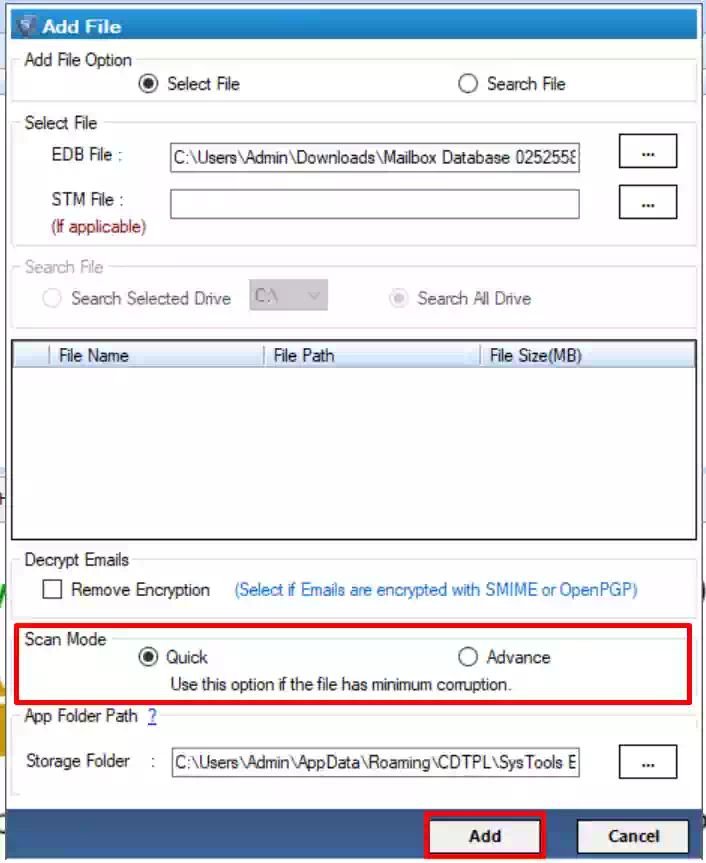
Step-1. Run the Software & then Click on the Add File button.
Step-2. After adding files, users can also decrypt encrypted files. Moving further, Click on the Quick Scan button to scan & repair corrupted or damaged files.
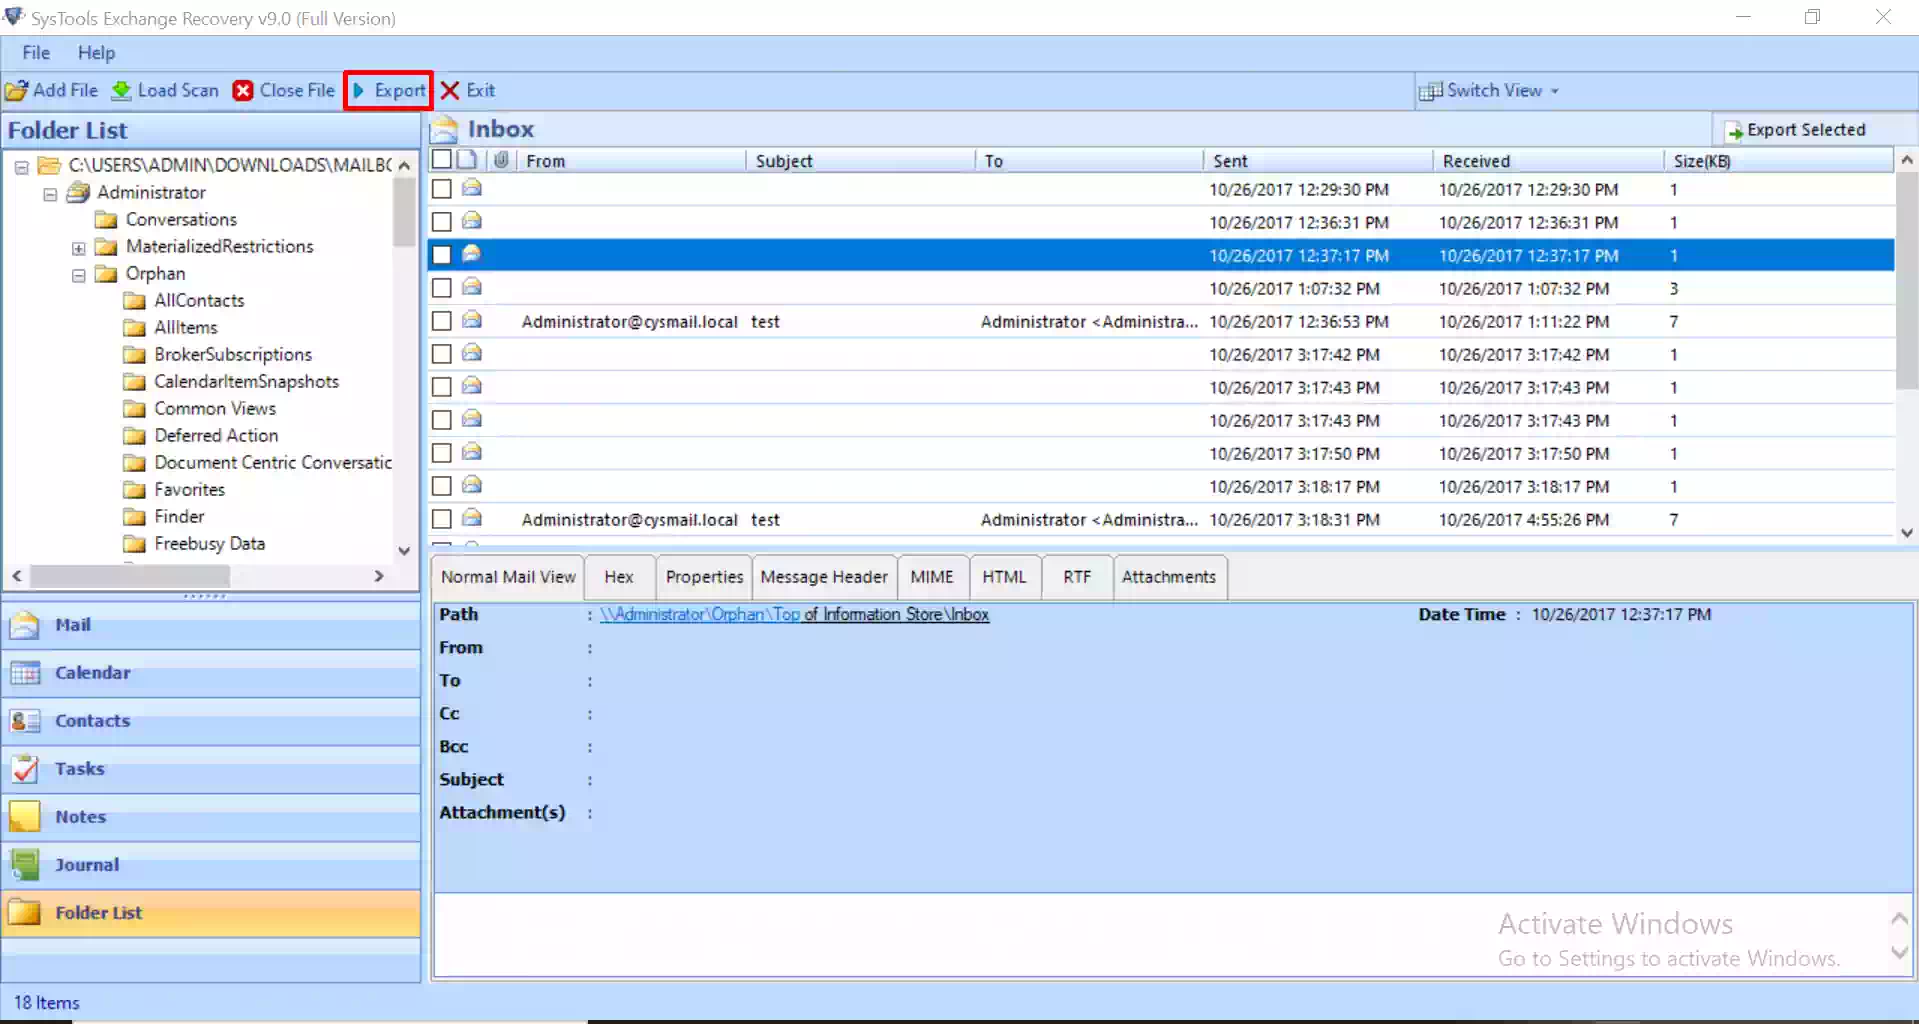
Step-3. Select the Mailbox you want to export & then simply Click on the tiny Export button on top.
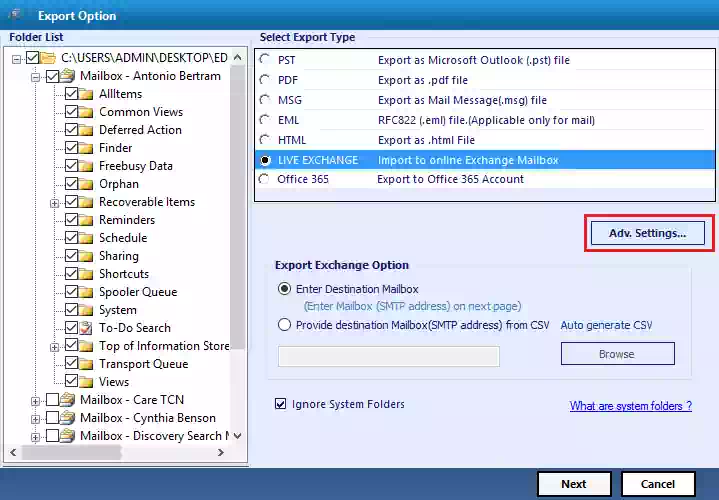
Step-4. Select Live Exchange >> Select the Destination Mailbox >> Advance Settings button.
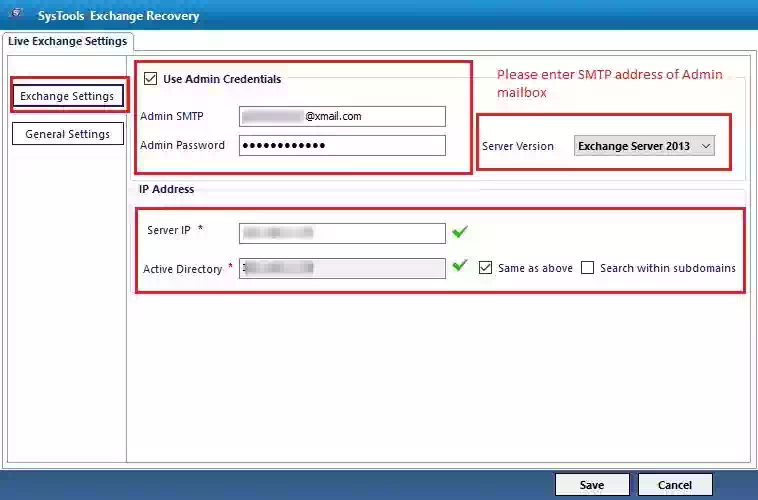
Step-5. Enter Destination Exchange Server Credentials & then Click on Save.
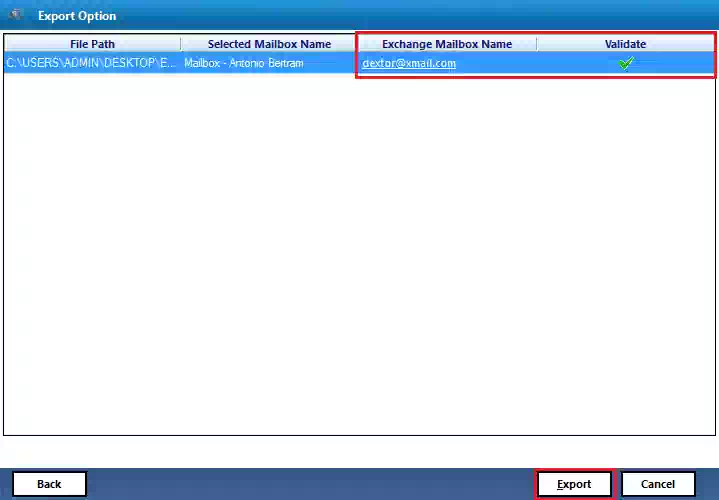
Step-6. Validate Mailboxes & Click on the Export button to begin the migration.
Why Is the Automated Method Better than the Manual?
As we just finished with the manual approach, let’s get to know the features of the software that explains why it is optimum for Exchange to Exchange migration.
- This tool can decrypt SMIME/OpenPGP encrypted files before migrating them.
- It’s quite easy for this utility to repair corrupted or damaged files before migration.
- It can recover deleted items & export public folder EDB Mailbox to PST (private too).
- Comes with various filters for selective data migration to increase overall efficiency.
- This tool safely migrate exchange to exchange data without any data loss or errors.
- The tool is easy to use for users & has a simplified GUI with short steps to execute.
- Compatible with all the exchange servers, windows OS & export files to various formats & platforms.
Conclusion
Now after learning both the manual & automated solution, it’s quite easy for users to execute this Exchange to Exchange migration in a safe manner without facing any critical challenges. The most crucial aspect of this operation is to select the method wisely along with the tool. Considering a manual solution is not a practical option unless you’re migrating such a few files. An automated solution is an IT expert’s first choice & a sure-shot solution to solve user queries.