How to Export Emails from Google Workspace – Complete Guided Solution


Exporting emails from Google Workspace to the local device can really help you access your cloud data in the event of downtime and cyber attacks. Doing this is not just a best practice but a necessity for ensuring data security, compliance, and operational resilience. It provides peace of mind that your critical business data is safeguarded and accessible when needed, helping to mitigate risks and maintain business continuity.
Table of Content
Providing security is the job of Google, but how we keep ourselves secure depends on us.
Out of the many reasons that urge users to export their email from Google Workspace, making a copy of data remains on top. According to a study by EMC, global data loss and downtime cost enterprises $1.7 trillion in 2014 alone. Our top priority is protecting our data and keeping it safe from unwanted deletions, hacking, or data loss.
I should not stress how important emails are. You know it very well! Whether it is of an individual or an organization, a major chunk of our day goes into exchanging emails with our clients, teammates, etc.
Don’t you think so?
With so much data stored in Google’s house, should you let Google take control of your ship completely? A report from Cisco states that 29% of data breaches involve the loss of corporate data stored on third-party platforms. As cybersecurity expert Bruce Schneier aptly puts it, ‘Data is the pollution problem of the information age, and protecting privacy is the environmental challenge’. Don’t you feel it is important to have a copy of it with yourself too?
Thus, it is a mandate to save and keep your emails from Google Workspace aside from future references.
How can you do that? This is what this article is for, to guide you on the ways to export G Suite emails.
Different Ways to Export Emails from Google Workspace
There are three primary methods for users to export their emails from G Suite: utilizing Google’s built-in tool, using MS Outlook, and deploying the reliable and secure Freeviewer utility. Let;’s discuss each of them separately, and learn about the the best way to do it.
Method 1: Export Emails from G Suite Using Google’s In-built Tool
For all those of you who don’t know Data Export Tool is an in-built tool of Google. It allows the super administrators of the company to move the data of the user to a Google Cloud archive.
Prerequisites for Using the Native Tool
- The domain needs to be 30 days older to use this tool.
- It requires the 2-step verification to be enabled by the super admins.
- The number of Google Workspace user accounts must be less than 1000.
- Only super admins of the organization’s Google services domain can use this tool.
Working Steps of the Manual Solution
Step 1. Initially, sign in to your Google Workspace account using your super-admin credentials.
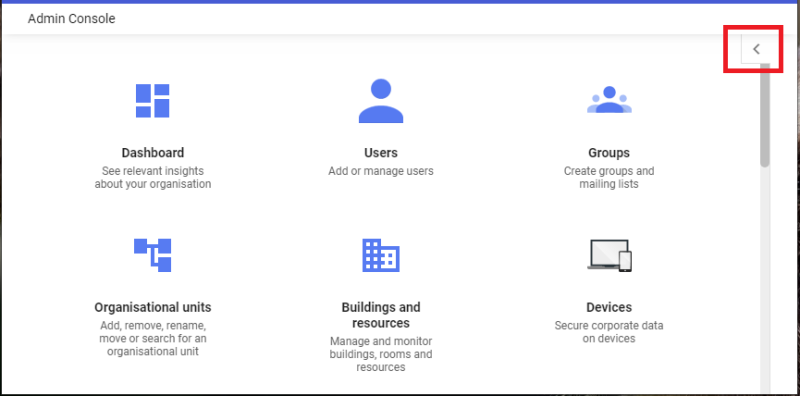
Step 2. Now, go to the Admin Console and click the “<” arrow in the upper right corner of the screen.
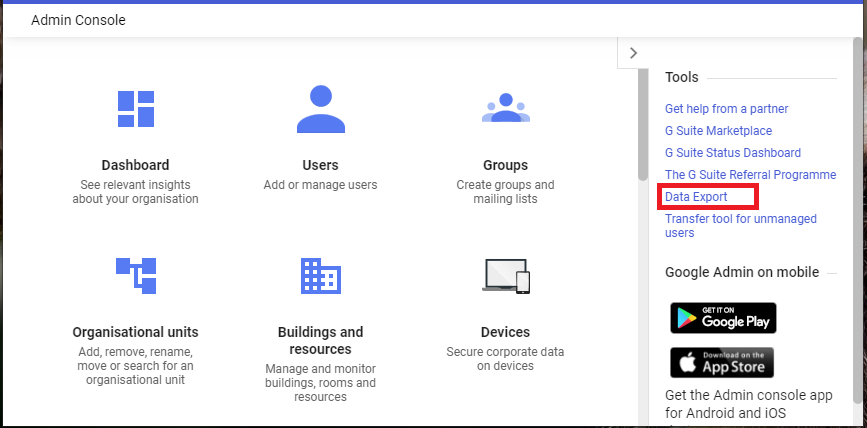
Step 3. Next, go to the Tools menu and select the Data Export option from the drop-down menu.
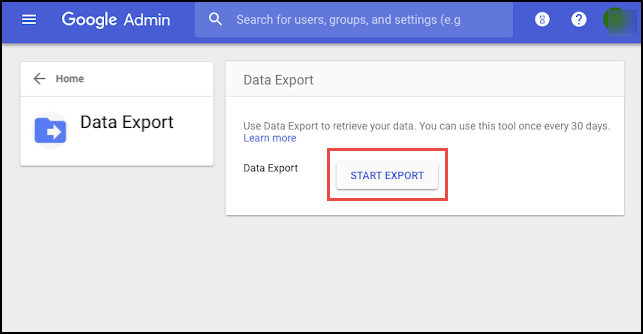
Step 4. In the Data export box, click on the Start Export button to begin the export process.
Depending on the extent of your data, you will have to wait for Google to process all of your Google Workspace accounts and email you a confirmation code for your exported data. It usually takes 72 hours, but it might take up to 14 days. At the conclusion, you will receive an email informing you that the procedure is complete.
Step 5. After receiving the confirmation link, open it and select the Access Archive option to gain access to the processed data.
Step 6. In Google Cloud Storage, navigate to the root folder in the archive to see a list of user folders. Each user folder contains a zip file containing the user’s data.
Step 7. Double-click the zip file.
Step 8. Unzip the file to view the product information for each user. The exported data can be accessed for 30 days before being permanently deleted.
Method 2: Export Emails from Google Workspace with MS Outlook
In this solution, one has to execute the complete process in three steps. Firstly, enable IMAP in your G Suite account, and then add an IMAP-enabled G Suite account to MS Outlook. Then export G Suite emails to PST.
Step 1. Enable IMAP in G Suite Account
- Initially, open any browser and search for Google Admin Console.
- Enter your G Suite account user ID and password.
- After login, users will find a home page of the Google admin console.
- Then, tap on the Google Apps icon and hit on the Gmail app.
- From the Gmail Wizard, hit on the Gear icon and tap see all settings.
- Here, choose Enable IMAP from the Forwarding and POP/IMAP tab. After that, tap the save changes button.
Step 2. Add IMAP Enabled G Suite Account to MS Outlook
- Open your MS Outlook and hit the file button.
- Then, from the info tab hit on the add account button.
- Enter the IMAP-enabled G suite user account and configure the account to MS Outlook.
Step 3. Export G Suite Mailbox to PST with Import/Export Feature of Outlook
- Firstly, open your MS Outlook and hit the file button.
- Here, choose open & export>>Import/export.
- Select the option export to a file and hit on next button
- Choose the .pst file and hit on next button.
- Then, choose the added Google Workspace account and tap on the next button.
- Choose the saving path and tap the finish button.
After executing all three steps, anyone can export the Google Workspace mailbox to PST format by using MS Outlook.
Constraints of the Manual Method
- After selecting the “Start Export” option, there are high chances of obtaining errors.
- The program only allows you to repeat the export procedure once a 30-day period has passed since your last export.
- It does not allow you to export only your selected data, and this is true for certain users. Without exception, the program exports all of the data from all users.
- If you do not unzip your files to the user’s data, they are erased after 30 days.
- There are times when users wish to halt the export process in the middle, but this utility does not provide that option.
- This is a lengthy procedure. You don’t know how long it will be until you get the link.
Method 3: Expert-Recommended Tool to Export Emails from G Suite
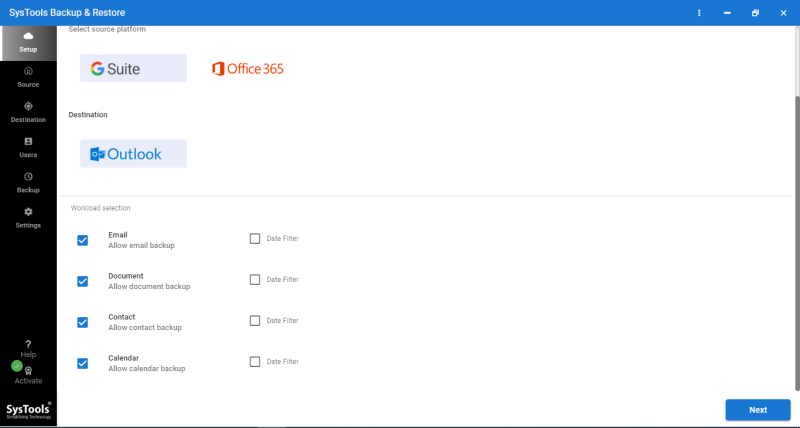
Google Workspace Backup Tool is the best software to save and export emails from your Google Workspace account. This tool provides an option to save data from G Suite all at once using the concurrent migration option. It even saves data from multiple user accounts. The emails can be converted to PST file format. Apart from emails, it also backs up contacts, calendars, tasks, etc.
Working Steps to Export Emails from Google Workspace
Following are the brief steps that tell you about the working methods of the tool:
Step 1. Firstly, download the tool on your system and then launch it.
Step 2. Since you want to export your emails from Google Workspace, tick the email box and apply filters as required.
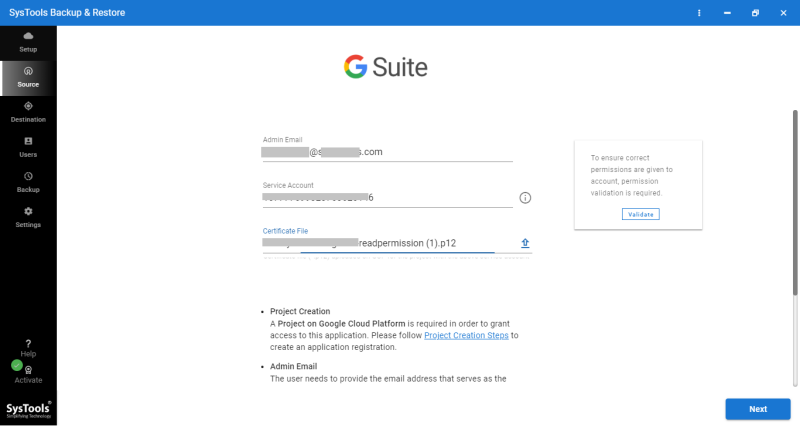
Step 3. Now, enter the required details of the Google Workspace account.
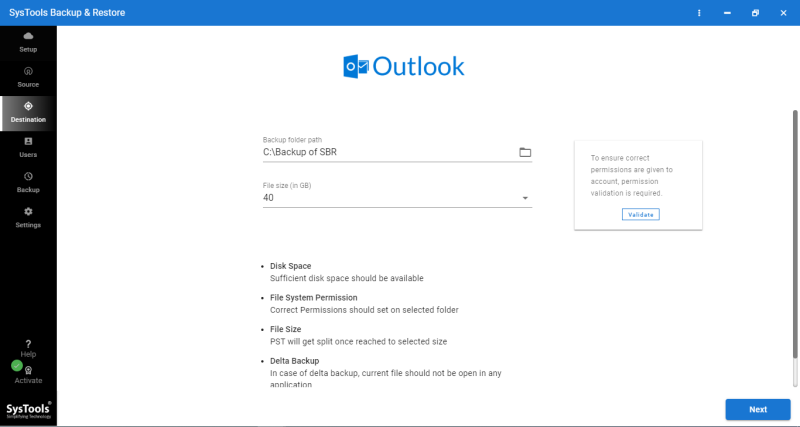
Step 4. Then, select the folder path that will save the resultant PST file.
Step 5. After that, select the fetch users option to fetch all users and choose among them later, or simply import CSV file to add the user accounts.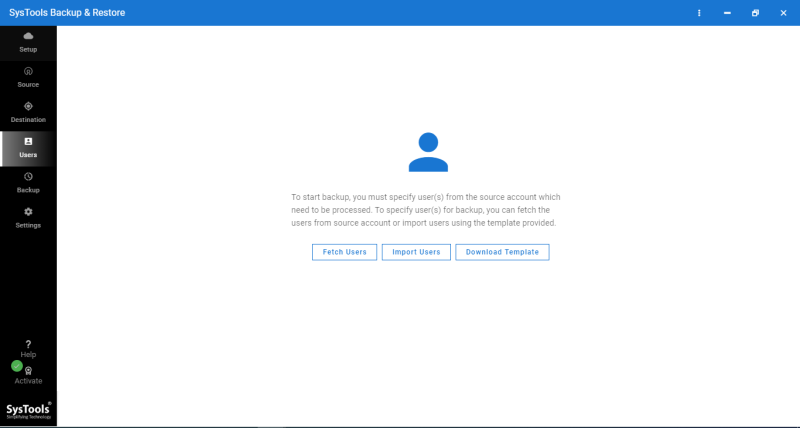
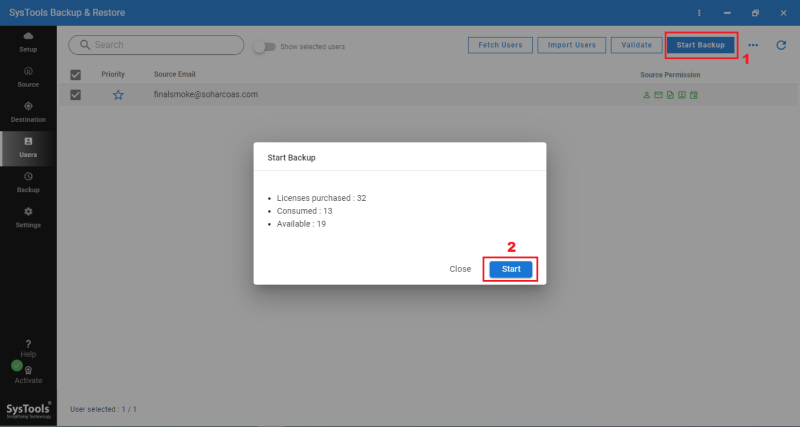
Step 6. Finally, click on the “Start backup” option to export the email of Google Workspace.
Note: Additionally if any user wants to export their cloud data especially Microsoft 365 data to any of the file formats, then, he or she can use one smart solution for that. FreeViewer offers thee complete solution, which is especially designed to export Office 365 mailbox to PST, EML, MSG Format.
Download Now Purchase Now
Last Words
By now, you might have surely realized how important it is to keep a copy of your data. Along with that, how you can do it is also explained in this article. We suggest using a professional tool. As noted by cybersecurity expert Bruce Schneier, ‘Data breaches are inevitable and can cause significant harm if not properly managed.’ The reason for this is explained clearly in the limitations of the manual tool.
Some Questions Asked by Users
Q1. Can I export emails from Google Workspace by using Google Takeout?
A. Yes, you can, but the Google Takeout method has not been discussed in this article for the following reasons:
- It can save only the data of a single user.
- If the data is too large, Google Takeout-facing failures are very common.
- Google Takeout is a Gmail export solution and not Google Workspace’.
- It is a very long process as users may take days to receive the link.
Q2. Is there any free solution to export emails from G Suite?
A. Yes, users can use Google in a built tool named Data Export tool which is mentioned above section.
Q3. Is it possible to export 60 GB G Suite Data by using the manual method?
A. No, It is not possible to export 60 GB G suite data with the manual method. But, by using professional software you can export unlimited data without any limitations. A report by Datto indicates that manual backup methods can fail to handle large data volumes effectively. However, using reliable software you can quickly follow these steps to export emails from Google Workspace without any data size limitations:
- Step 1. Install & Run the tool on Windows OS
- Step 2. Select Source & Destination Platforms
- Step 3. Provide Admin Credentials of Platform
- Step 4. Validate Source & Destination Platforms
- Step 5. Click Start Backup to Initiate the process