Know – How to Migrate Exchange Server to Office 365 Simultaneously


Are you are interested in finding out how to migrate Exchange Server to Office 365. Have you found a workable solution yet? If your response is negative, do not worry. In this article, we have described the most modern way, that you can use to execute the Exchange Server to Office 365 migration procedure with minimal effort. Let’s start by using an automated process to finish the job.
Let’s begin by looking at the user’s question so we can better understand how to address it.
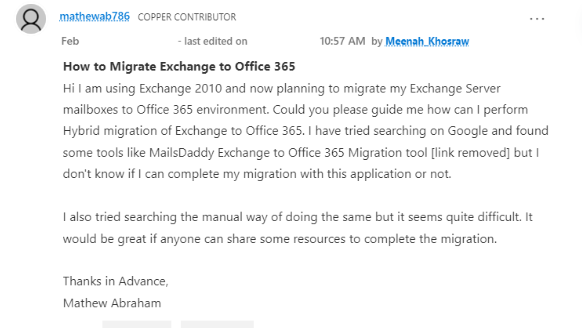
User’s Query 2.
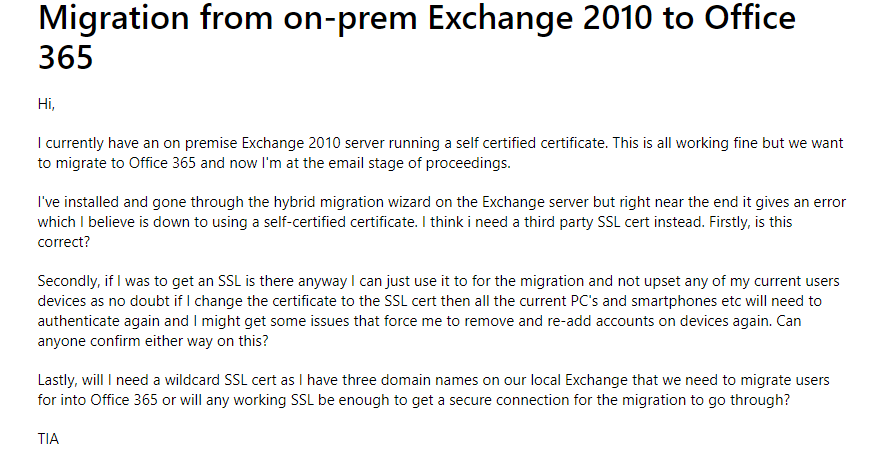
Anyone facing the same problem shown in the screenshot can try out the smart solution mentioned below, which is much more reliable than any manual solution.
Expert Solution for Exchange Server to Office 365 Migration – Instantly
The process to migrate Exchange Server to Office 365 seems quite complex, but not with this i.e. Exchange to Office 365 Migration Tool. You just have to download it from its official website, for free, and understand how efficient is it.
With this solution, the process of moving from Microsoft Exchange to Exchange Online becomes as simple then expected. Moreover, this can move the data along with the items and attributes. On top of that, it is compatible with all the versions of Windows Operating System and has no file size limitation.
Steps to Migrate Exchange Server to Office 365
Now, let’s go through the step-wise instructions of the specified solution:
Step 1. Launch the software and Select the Source platform( Exchange Server) and Destination Platform( Office 365).
 Step 2. Select / Deselect data items and apply a date filter if required.
 Step 3. Select Exchange Server Version and enter other required details here.
 Step 4. In the following window, you need to enter Office 365 Admin Email and Application ID.
 Step 5. Now, you have to mention Source Users. For that, you can either fetch users or Import users via CSV file. The CSV file template can be downloaded from the tool itself.
 Step 6. Map Source mailboxes with destination mailboxes and validate them.
 Step 7. Hit the Start Migration button and the tool will start the migration process.

After understanding the aforementioned solution with its steps, we don’t think so, that you need to opt for any other solution. Still, if you want to know about manual techniques, then they are described in the next part of the phase.
Manual Methods for Exchange Server to Office 365 Migration
Three methods can be used to migrate Exchange Server to Office 365 directly. Remember, these techniques require additional planning, preparation, & permissions, and many times this shows the Exchange Server is in an inconsistent state error.
Plus, it requires some technicalities and time to proceed with the transition, since it is a complicated and as well as lengthy. This pretty much covers all the methods and the disadvantages of using manual methods. Take a look at the workarounds:
#Technique 1. Cutover Migration
This type of migration method allows you to export less than 2,000 mailboxes in a single shot. The cutover migration supports Exchange versions 2003, 2007, 2010, & 2013. This method can be divided into four stages. Follow one after the other to finish the process to migrate Exchange Server to Office 365 without facing any hurdles:
Step 1: Planning
The process of Exchange Server to Office 365 migration needs proper planning including the steps mentioned below:
- First, open the site of the Exchange Deployment Assistant
- As soon as the site is launched, you will have 3 options. For a cutover migration, you need to choose the Cloud Only option. Therefore, click on Cloud Only
- Now, you need to answer all the questions that are asked of you
- Once it is done, click on the Next arrow
- This Exchange Deployment Assistant will create a step-by-step guide for you, that you need to follow.
Step 2: Testing the Existing Setup
Now, with the help of the guide provided by Exchange Deployment Assistant, you need to be sure that Exchange Server infrastructure supports Outlook Anywhere & Autodiscover. Once this step is completed, you can go to the next stage of this process to migrate Exchange Server to Office 365:
- First, open the site of Microsoft Remote Connectivity Analyzer
- Choose MS Outlook Anywhere (RPC over HTTP) test and click on Next
- Enter the requested information. You need to confirm that you are using Autodiscover for the detection of server settings.
- Now, type in the Verification code and click on Perform Test.
In case the test fails, use the report generated & the Exchange Deployment Assistant for the resolution of the issues.
Step 3: Migrate Exchange Server to Office 365 by Configuring Cutover Migration
- First, open Internet Explorer and then log in to the Admin Center of Office 365.
- Now, open Exchange Admin Center and click on Migration.
- Then, click on the drop-down menu & choose Migrate to Exchange Online.
- You need to choose Cutover migration followed by clicking on Next.
- Now, enter the credentials of on-premises account credentials and click Next. At the time of proper configuration, Autodiscover should resolve the on-premise Exchange Server & the RPC Proxy Server
- Then, click on Next and enter the name for the New Migration Batch. Click on Next once again
- In this step, you need to choose a user who will get the report after the migration. You can select multiple accounts. Now, if you are prepared to migrate Exchange Server to Office 365, then start the batch automatically. If not, then select manually start the batch later.
- Click on New. The new migration batch will be created
- You have to wait for some time for the completion of the process. To see the details of migration, click on the View Details option.
Step 4: Completion of the Migration
Once the synchronization from Exchange Server to Exchange Online is completed and all accounts are provisioned, a report will be emailed to you. Now, as soon as you get the report, you can proceed to the completion of the process.
- Migrate Public Folders: This means the migration of Exchange Public folders to Exchange Online.
- Assign Office 365 licenses to all the users.
- After the completion of the migration of all the emails to Office 365 and replication of MX record DNS, you can stop the process of migration.
Remember: The above-mentioned conventional method is a process on, which users cannot rely to migrate Exchange Server to Office 365. As there is a chance of loss of data in the Exchange Server to Exchange Online migration method, users have to devote much time to complete it, for some users, it is not easy to understand, etc.
#Technique 2. Staged Method for Exchange Server to Office 365 Migration
The staged migration procedure can transfer more than 2,000 mailboxes in batches over a certain period. You can migrate data from Exchange 2003 & 2007 versions. So, without wasting any time, let’s have a quick look at the instructions of the same using EAC:
Step 1. Initiate the process by assessing and prioritizing the workload required for the phased migration.
Step 2. Validate ownership of the destination domain within the Microsoft 365 environment.
Step 3. Implement directory synchronization to establish user accounts within Microsoft 365.
Step 4. Make a list of all the user email accounts that need to be moved.
Step 5. Establish a connection between the existing email system and Microsoft 365.
Step 6. Execute the migration of Exchange On-Premises mailboxes to the Microsoft 365 platform.
Step 7. Progress with the staged migration in manageable batches to minimize disruptions.
Step 8. Transform on-premises mailboxes into mail-enabled users within the Microsoft 365 environment.
Step 9. Verify uninterrupted email flow to Office 365 to maintain hassle-free communication.
Step 10. Finalize each staged migration batch.
#Technique 3. Migrate Exchange Server to Office 365 Via Hybrid Migration
Use this to migrate from Exchange 2013 to Office 365 for 150 – 2,000 mailboxes, you can easily configure the two platforms and make a hybrid platform. This migration works with Exchange 2010 and 2013 versions.
Here are the guidelines for migrating Exchange Server to Office 365:
Step 1. Start moving data from your old email system to the new one by setting up a connection between them.
Step 2. Get the proxy service running that helps transfer data securely between your old and new email systems. This keeps everything safe and makes sure nothing gets lost.
Step 3. Use the Exchange Admin Center to begin moving the user’s email boxes. Follow the Hybrid Migration Wizard to help you smoothly move your emails from one system to another.
Step 4. Once you migrate Exchange Server to Office 365, delete those data that you don’t need which helps them to manage properly.
Drawbacks of the Traditional Techniques for Exchange Server to Office 365 Migration
Let’s look at the common issues that might be faced during the migration:
- These manual solutions might take up a lot of time to complete the procedure and lead to an extended downtime due to the complicated steps involved.
- It requires technical knowledge and hands-on expertise in Exchange Server and Exchange Online.
- There might occur errors that can lead to data-loss situations since it is a lengthy and complicated method and even one wrong step can cause a lot of trouble.
- You cannot migrate data from mailboxes according to a certain period for selective transfer.
Observational Verdict
Switching from one platform to another has always been a critical challenge for organizations. Plus, this needs proper planning and deployment so that you don’t lose important data during the Exchange Server to Office 365 migration.
Therefore, we mention the issues organizations face and the manual solutions to migrate Exchange Server to Office 365. However, these solutions also have their limitations. So, it is recommended that you select a specified automated software and a seamless migration.