Error Code 17897 Outlook 2011 for Mac: Solved in 3 Simple Ways
There are issues that can occur with any technology that can affect smooth working in an organization. It can be quite a hassle as most businesses run via communicating through emails. It can be restricted by error code 17897 Outlook 2011 for Mac. It is a common problem faced by many users. It causes trouble in sending messages via the desktop client. Most of them look for solutions online. For them, this post contains all the answers. It discusses the top three ways to resolve this situation and resume communication. Continue reading to find out more.
Quick Glance at Error 17897 in Mac Outlook
It can be caused due to lack of proper authentication of an account. It is a failure in configuring the mailbox correctly causing Mac Outlook 2011 Error 17897. The factors involved include misspelled email address, wrong password or incorrect SMTP port number. This restricts a user from sending and receiving emails. It can be solved by undertaking simple measures mentioned here to fix the situation manually.
Top 3 Ways to Resolve Error Code 17897 Outlook 2011 for Mac
Following are methods to resolve this problem and to open communication channel to resume networking:
Solution#1 Check Typed Information
The first thing to do in case of error code 17897 Outlook 2011 for Mac is to verify the configuration settings. Make sure that the email address and password are typed correctly. Confirm with the account owner if any changes to passcode were made recently. If they were, enter the correct info into the client. Try logging in with the credentials of a browser to confirm that the credentials are correct. Then, try sending a message to verify if it made any difference.
Solution#2 Check Authentication Mode
Listed here are the steps to remove error 17897 in Mac Outlook:
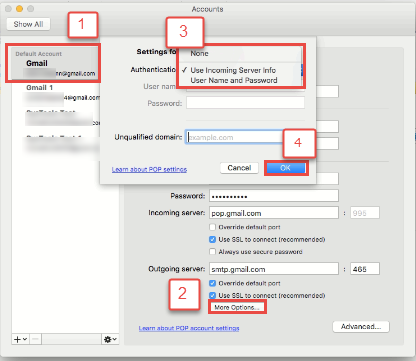
- First, launch the email client and go to Tools >> Accounts and select the account in question
- Then, click on the ‘More Options’ button under ‘Outgoing Server’
- If the ‘Authentication’ drop-down box is set to ‘None’, change it to ‘Use Incoming Server Info’
- Then, click on OK button to save changes and fix error code 17897 Outlook 2011 for Mac
- If it is set to ‘Use Incoming Server Info’ then, select ‘None’ option and click OK
- If using a different server for outgoing and incoming emails then, select ‘Username and Password’ option
- Next, type in the credentials for the outgoing mail server and click OK to confirm changes.
Solution#3 Check SMTP Settings to Fix Error Code 17897 Outlook 2011 for Mac
- First, launch the email client and go to Tools >> Accounts
- From the ‘Accounts’ dialogue box, select the mailbox having the problem
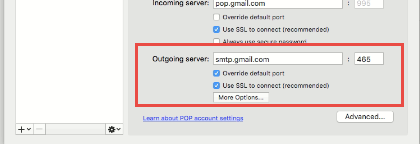
- Then, go to the email service provider’s website. Check the port numbers for incoming and outgoing servers
- Then, type in the same information in the box after ‘Outgoing server’ to fix error code 17897 Outlook 2011 for Mac
- Make sure that the box before ‘Override default port’ and ‘Use SSL to connect (recommended)’ are marked
- Then, close the Accounts window and try sending a message to check if the issue is resolved.
Conclusion
A major drawback of using the Microsoft desktop email client is the constant bugs and issues. They are quite common and simple steps can restore communication. This post covers the three main ways to resolve error code 17897 Outlook 2011 for Mac. It can be helpful for users stuck in a similar situation. It describes in brief what measures can be taken to solve this problem. It is only a matter of checking the settings and making sure they are correct. These are simple steps which anyone can perform on their system. It does not need much technical guidance. One just needs to follow the steps mentioned here precisely to avoid accidentally changing wrong information.


