How to Add Rackspace Email to Outlook? Complete and Quick Solution


Even a lot number of users on the Internet have a query – “How to add Rackspace Email to Outlook?” So, after a lot of research, our professionals have finally come up with the tool that helps users to convert their entire data to Outlook.
Rackspace is a webmail interface that allows users to manage appointments, calendars, and meetings through our webmail interface. It is possible for users to share calendars, import events, and add share calendars. But the main reason for switching from Rackspace is that it does not provide such facilities.
On the other hand, if we talk about Outlook, then we can say that it is one of the well-known email clients that is specially used for professional use. It is capable to manage mailboxes, emails, contacts, calendars, and entire data items properly in a flexible manner.
Both direct and professional solutions, are available on the Internet. Let us start discussing both the solutions properly.
How to Add Rackspace Email to Outlook Manually?
Since we know it is possible for Outlook users to easily configure other webmail accounts in their account. So, here we will do the same and add Rackspace email directly to Outlook with the help of configuration settings. Steps to take so:
- Log in to your Outlook Account.
- Go to File Menu >> Add Account.
- Enter the email address of your Rackspace email account.
- Then, choose IMAP from the next screen.
- And, enter the password of your Rackspace account.
- A successful message will appear on the screen.
Your entire Rackspace data will automatically be added to your account.
Simple Steps to Export Rackspace Emails to PST Format
- Open the Outlook application and go to Account Settings.
- Configure the Rackspace account in Outlook.
- Go to File >> Open & Export >> Import/Export.
- Select the Export to a file option.
- Get the resultant exported PST files.
Professional Solution to Convert Rackspace Email to Outlook
The above-mentioned manual solution is so much easy and more effective to use. But users need to have much technical knowledge regarding this software. So, we are going to clarify the solution with one another utility, FreeViewer IMAP Backup Tool. By connecting to this software, it is possible for both novices as well as tech users to easily operate on software. Having a flexible GUI is worth convenient for users to understand the features more properly. This powerful solution can easily handle a large amount of data and in just a few steps, it can convert Rackspace email to Outlook.
Apart from these, it is capable to add the data in multiple other formats such as PDF, MBOX, EML, TXT, HTML, MSG, EMLX, and others. The advanced settings have multiple inherited features in this such as the Date Range Filter option, Split PST file option, and others.
Step By Step Process to Add Rackspace Email to Outlook
Get the step by step process to export Rackspace emails to PST format:
- Launch and Install the mentioned Tool in your existing Mac OS system.
- From the IMAP Host option, choose the Other option from the list.
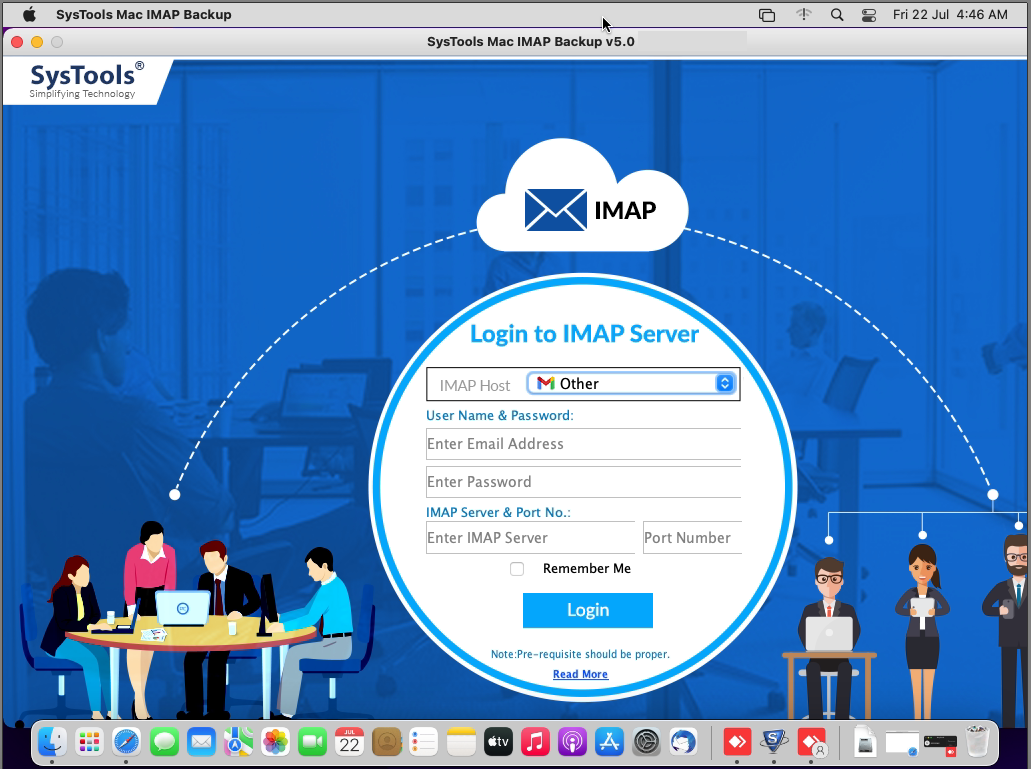
- Enter the login credentials of your Rackspace Email Account.

- Once done, there you will be able to get the preview of all Rackspace mailbox items.
- Choose the required number of mailboxes and from the Export, option >> select PST.

- Then, enter the destination location where you want to store your resultant files.
- Finally, click on the Start Backup option and the process will start automatically.

Import Resultant PST to Outlook
- Go to the Outlook Account.
- Click on File Menu >> Open & Export.
- Then, click on Import/Export option.
- Import the resultant PST files directly into Outlook.
- See the imported PST files.
The Verge
Hence, in this write-up, we discussed the complete solution to add Rackspace email to Outlook instantly. Now, it depends on you to continue with the solution matching your needs and requirements. Above all, we recommend you use an automated solution that can directly carry out the results with proper flexibility. In fact, it has the ability to maintain the hierarchy of all the files and folders without facing any issues.