Disable Hardware Graphics Acceleration Office 2010, 2013, 2016 Registry


Microsoft Office is a great application for Windows 8 / 10 platform and most of the users are using it on their system. However, this productivity suite generally consists of many technologies (inbuilt) inside it and sometimes the average computer will also suffer. If users are facing these issues such as crashing of MS Office components or not running properly and keep freezing or if they will work only in Safe Mode of MS Office, then technology named Hardware Graphics Acceleration might be the reason behind this. In fact, many times users may face various problems while working with Office 2013 and often advised to disable the hardware graphics acceleration. Almost in every case, disabling the hardware acceleration graphics will be the trick and solve all problems. Therefore, in this blog, we are going to discuss a manual solution to let users understand how to disable hardware graphics acceleration using the UI and Office Registry Editor.
Quick Glance on “Hardware Graphics Acceleration”
Hardware Graphics Acceleration is a new feature introduced in Office 2013, which sometimes referred to as “GPU rendering” The main purpose of this feature is to improve the performance of MS Outlook. In most of the cases, it seems to be acquainted with some Outlook problems such as freezing, malfunctioning, blurred text, Outlook hanging issue, cursor hangs randomly, and so on. One possible reason for this problem is to enable Hardware Graphic Acceleration.
How To Disable Hardware Graphics Acceleration In Office 2016 / 2013 / 2010?
Go through the following steps to disable hardware graphics acceleration in Microsoft Office suite using UI and by using Registry editor. Let us have a look:
1. With User Interface(UI)
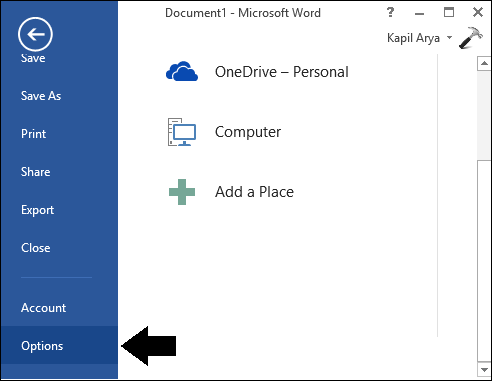
- First of all, open components of Microsoft Office 2013 for example Word, and create the blank document, click on File
- Then, navigate to Options in the below-shown screen:
- Now, choose the Advanced tab in the left-hand panel. Under the right-hand panel, scroll down and view Disable hardware graphics acceleration in the section Display. Then, check this particular option and press OK button

Now, you can close Microsoft Office 2016 / 2013 / 2010 and reboot the system. After restarting the machine, you will find some issues that you were facing in Microsoft Office is now resolved.
2. Using Registry Editor
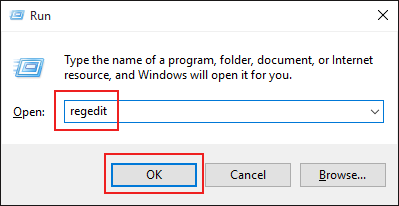
- Press Windows + R key together, type regedit in the Run dialog box and click Enter key to open the Registry Editor
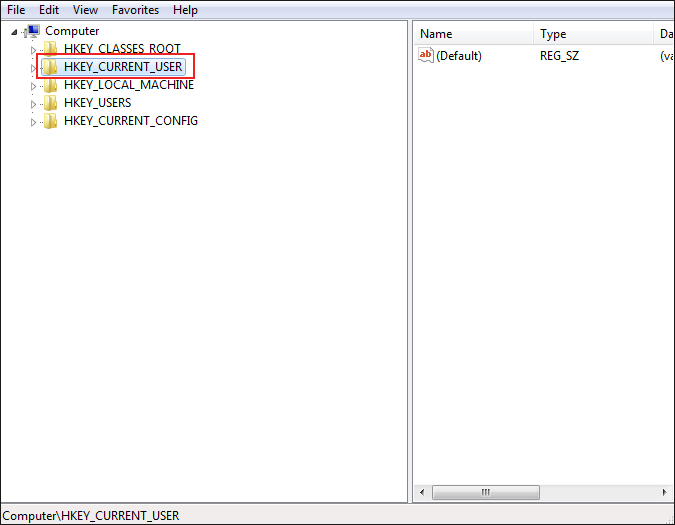
- Under the left-hand pane, navigate here:
HKEY_CURRENT_USER\Software\Microsoft\Office\15.0\Common
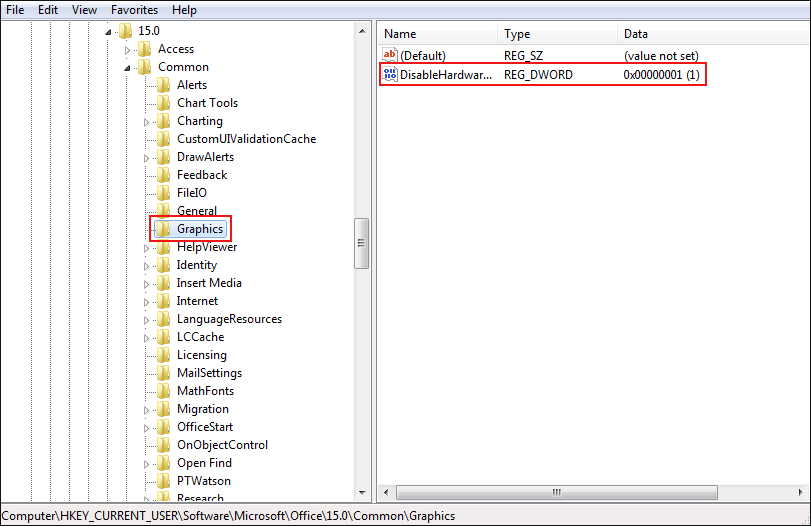
- Now, you should create the subkey to Common by right clicking over it and choose New and then, Key. Provide the name of this subkey as Graphics. In the right-hand pane of Graphics subkey, you can create a new DWORD by right click on the blank space and choose New and DWORD Value. After that, giving a newly created DWORD as DisableHardwareAcceleration and then double click on it to find out this:
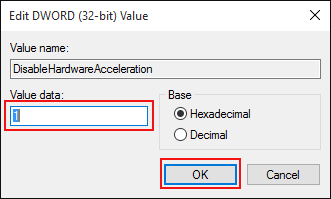
- In the above dialog box, you can change the Value data from 0 to 1. Press OK button. Close the Registry Editor and then, reboot the system to make some changes effectively.
Final Words
Many challenges are faced by the users while using MS Office 2013 on their machine. After keeping in mind all the issues faced by end users, we came up with this post. In the above write-up, we have discussed about “Hardware Graphic Acceleration” feature in detail. Also, we have covered the manual procedure to disable hardware graphics acceleration in Office 2016 / 2013 / 2016. Make sure you follow every step very carefully.