How to Restrict Access to USB Ports? Stepwise Solution


If you are seeking to restrict access to USB ports, then this is the right blog for you. Here you get a complete solution to block all USB users. In this article, we are going to discuss two methods through which you can easily solve the issue of how to deny access to USB ports.
Before understanding these two methods, we need to know what USB ports are.
A USB Port is a standard cable connection interface for personal computers and consumer electronics devices. USB stands for Universal Serial Bus, an industry standard for short-distance digital data communications It allows USB devices to be connected and transfer digital data over USB cables. It also supplies electric power across the cable to devices that need it.
Now, let us move towards the solution by using two methods that are manual and automated.
Block or Deny Access to USB Ports with a Few Clicks
1: Download and install USB Blocker Tool.
2: Enter Master Password and confirm the password.
3: Click the “Block” button to start the USB blocking process.
4:Enter the admin and master password to disable USB.
How to Restrict Access to USB Ports Easily?
We are going to look at one way to disable USB device Read and Write access in Windows 10. Windows comes with group policies that control all the working environments for users and computer accounts. Through this, you can easily control your USB devices’ permissions by configuring a group policy. So, let us take a look at a scenario that you can control manually.
Manual Approach to Denying Access for All Users
To perform the manual method, you have to restrict USB devices for all users. This can be done with a few easy steps, which are mentioned below: –
- Firstly, you need to open the Local Group Policy editor. To do that, go to the “Run” and type the gpedit.msc and click on Enter.
- Now, once the group policy editor opens, you will see two options: “Computer Configuration” and “User Configuration”. And, open the User configuration by double-clicking on it
- In the next window, browse to the following path: Administrative Templates>>System>>Removable Storage Access
- After that, in the next Window, you will see a list of Group Policy settings that include different types of devices, including CD and DVD, Tape drives, WPD devices, Floppy Drives, and Removable Disks. The ones that we are interested in are Removable Disks. From these settings, you can control both Read and Write permissions for USB flash devices. So, let us go ahead and Deny both Read and Write Permissions
- Now, double-click on both permissions one by one and select the Enable option to enforce these restrictions. Click “Apply” and then OK.”
- When applying these restrictions, you can check whether the settings have been applied correctly or not. Therefore, to check that, insert a USB flash drive into your system’s USB port and try to open it from “My Computer”. It should give the following message:.
- Therefore, if you see this message, that means the policy setting has been applied correctly and you have successfully restricted access to USB drives for all users. And, to remove the policy setting, simply go back to the settings and select Not Configured.
After performing the manual method, we see that users have to face several challenges to do it. The manual method provides security for the USB flash drives. So, we suggest you use our software to deny access all USB ports, which are safe and secure for all users. So, in the next section, we are going to discuss an automated solution that helps to perform this task easily and simply, along with its working steps.
Most Secure Solution to Restrict Access to USB Ports
Use the best FreeViewer Suggested USB Port Blocker Tool to restrict all access to USB ports easily without facing any single error. USB blocking is a cybersecurity strategy that is crucial for preventing unauthorized USB flash drives and other auxiliary devices from connecting to all your endpoints. This software allows Device Control Plus, which is a dedicated device control and file access management solution that lets you smartly detect and block all the unverified USB devices and only allow the trusted devices to be active within your network.
Therefore, this utility also enables admins to monitor the user actions and devices file to access permissions where you require them. The admins configured the setting to lock USB ports, by default if they express permissions for a drive. It is safe and secure for both the users technical and non-technical to complete their tasks without facing any hassle. And, it provides a 100% guarantee to secure all the USB ports through which no one can misuse the USB flash drives without admin permissions.
Now, after knowing about the automated software. Let us move toward its working steps which are listed below:-
Also Read: If you want to recover permanently deleted files from USB drive then click on this link.
Working Process to Restrict Access to USB Ports Windows 11, 10
So, due to a lot of security reasons, if you want to block USB ports or deny System USB drives, then use the above automatic software, which is the best option to keep out of reach of unauthorized users who use the USB drive to extract crucial data in your absence.
- Download and Run the software on Windows 11, 10, 8, and 7. Now enter a valid email ID to receive an OTP (one-time password).
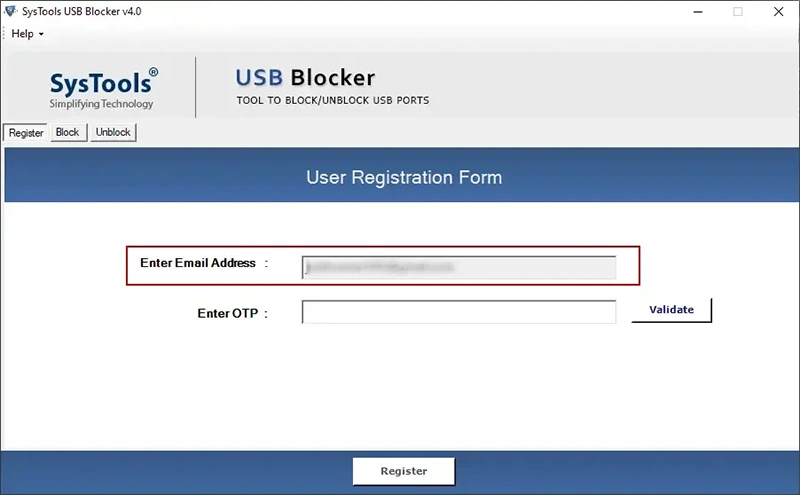
- Check OTP in email now, copy or type OPT.
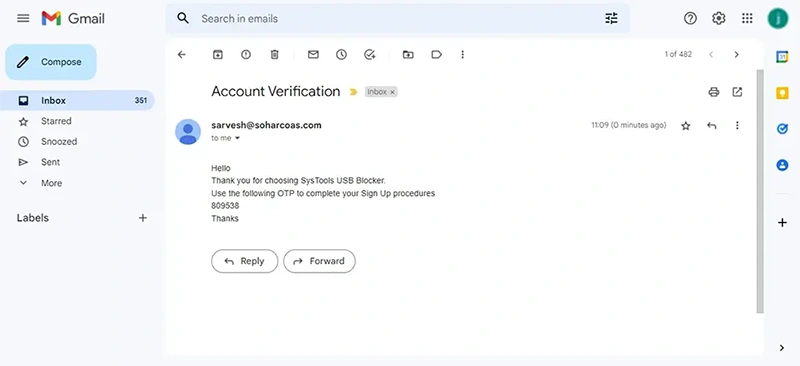
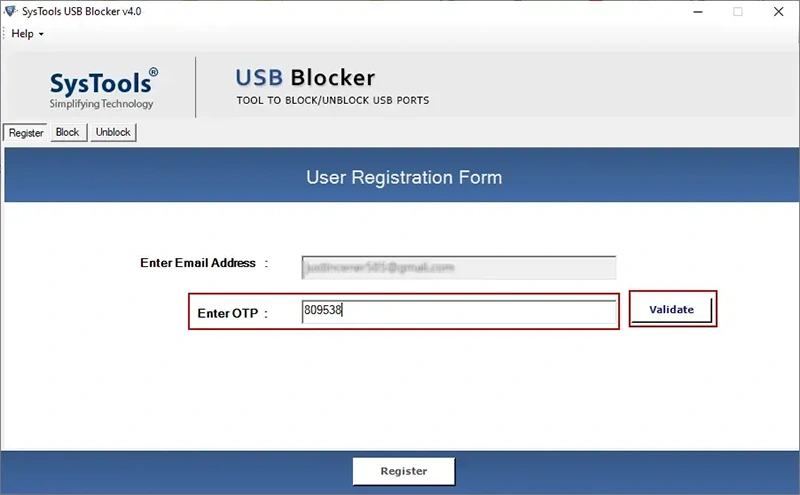
- Enter or paste the received OTP into your email address. Then click the “Validate” button.
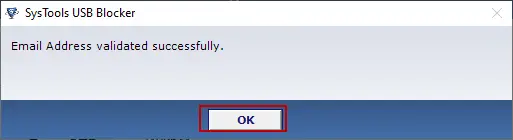
- After the OTP is verified, a pop–up window will appear stating that the email address has been verified.
- After that, you need to create a master password. So enter your master password and repeat it to confirm.
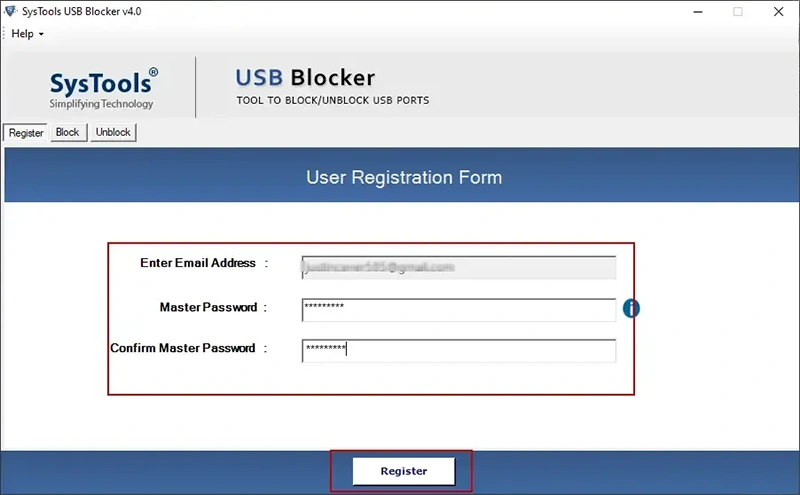
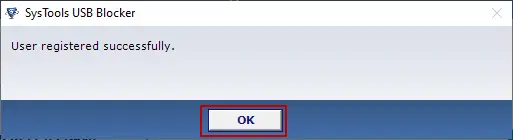
- After creating the master password, a pop-up message will inform you that the user registration was successful.

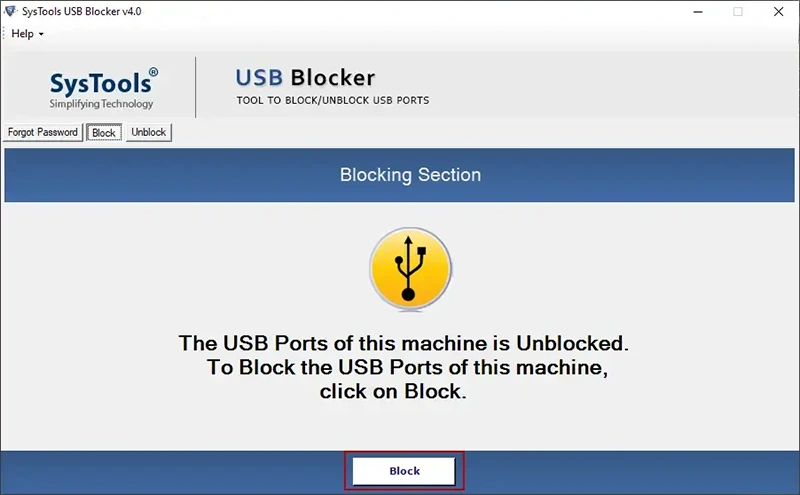
- Now click the “Block” button to block all USB ports from any system.
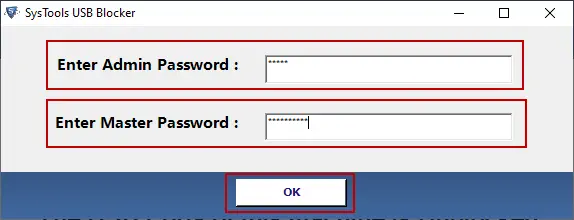
- After this, enter the admin password (user system password) and the master password created during registration.
- After the USB is blocked, a pop-up window will appear indicating that the USB port is blocked.
So, this is a complete working step to deny access to USB ports using tools.
Conclusion
In this article, we have discussed how to restrict access to USB ports without facing any hassle. So, in the post, we talk about two methods which are: manual & automated methods. The manual method cannot provide security to the user’s USB drives. But on the other hand, automated software will provide 100% safe and secure all the crucial data with them. It also helps to Block and deny access to USB ports using the software. Choose as per your requirement which is one better for your issues.
Common Asked Question by Users
Q1: How does software work?
A: USB Blocker will block or enable USB devices to prevent malware infection, data loss, and theft.
Q2: Can all USB ports be restricted?
A: Yes, the USB port may be blocked on desktops or laptops. This is usually done to deny access to malicious removable storage devices that can infect your system or steal valuable data.
Q3: How do I know if USB is locked?
A: To find out if your USB is locked, we recommend that you use your system’s device manager to check for hardware changes. To accomplish this process, follow the steps below:
- Open control panel.
- Open Device Manager.
- Right–click on System or Computer and select Scan for Hardware Changes.
Alternatively, you can try restarting your computer or disabling and enabling all USB controllers in Device Manager to resolve this issue.