How to Check Bad Sectors on Your Hard Drive


If your computer has become unusually slow, frequently freezes, displays disk read errors or certain files suddenly refuse to open well it may be time to check bad sectors on hard drive. Bad sectors are damaged areas in your data storage system that can prevent it from reading or writing data correctly, leading to file corruption, performance issues and in some cases a data loss situation.
The good news is that bad sectors do not always mean that your hard drive is completely corrupted as modern versions of Windows include built-in tools that can scan the drive, identify those problematic partitions and simply help you assess the overall health of your disk. Identifying these issues early will give you the opportunity to backup all of your important files and take remedial action before the damage gets worse.
In this guide we will explain to you how you can easily check for bad sectors on hard drive using different methods, understand what the scan results mean and also we will discuss what to do if bad sectors are found on your HDD or SSD.
Are All Bad Sectors the Same?
Just imagine your hard drive is a thick notebook where your computer writes down all your files. When the system struggles to read that specific page it simply flags that spot as a “bad sector.” Understanding the difference between logical and physical bad sectors reveals if your family photos are actually in danger.
- Logical (Soft) Bad Sectors: Think of this as a page covered in messy, scrambled handwriting. The paper itself is completely fine and a quick software scan can easily erase the mess to fix the error.
- Physical (Hard) Bad Sectors: This is like a physically torn page. No software can magically repair damaged hardware.
Since torn pages cannot be fixed and your system uses a clever workaround called remapping bad sectors. It essentially slaps a “Do Not Use” sticker directly over the broken spot that telling the computer to save future files on a healthy spare page at the back of the book instead.
While a few blocked-off pages are perfectly normal and a sudden pile-up of these stickers means your entire notebook might be falling apart. Knowing when a drive is physically breaking down prepares you for catching the warning signs.
Catching the Warning Signs: How to Spot a Failing Drive Early
We rarely suspect physical hardware when computers act up and usually blame glitchy software instead. However recognizing the early signs of physical hard drive failure can mean the difference between securely saving your important data and losing them forever. When your internal storage starts breaking down then it gives off specific distress signals. The drive physically struggles to read its damaged pages causing the entire operating system to panic and stumble.
You can simply these five common symptoms:
- The mechanical “Click of Death” (hard drive clicking noise troubleshooting must begin immediately if you hear repetitive ticking or grinding sound).
- Frequent “File Not Found” errors when you open previously healthy documents.
- Your computer freezes completely for minutes at a time while simply trying to save a file.
- Very slow boot times that turn a quick startup into a frustrating wait.
- And unexplained system crashes that force your computer to restart.
If your device displays these red flags then your first instinct might be to run a repair tool immediately. But let me tell you before you click on anything you should absolutely prioritize backing up your data first.
Safety First: Back Up Important Data Before Running a Scan
Before you scan and check bad sectors on hard drive it is a good idea to back up all your important files such as photos, videos, documents and other personal data. If your drive is already showing signs of failure then any intensive scan or repair operation may put additional stress on the disk and increase the risk of data becoming inaccessible.
As a precaution you should copy all your important files to an external hard drive, a USB flash drive or the cloud before you start scan. If your hard drive slows down or fails during the backup process then it is better to transfer smaller groups of files rather than large folders all at once.
Once your important data is safely backed up now you can proceed with the scan and troubleshoot the drive with greater confidence.
Windows Error Checking: The Easiest Way to Scan for Disk Problems
With your files safely backed up now it is time to check your hard drive health in Windows 10 or 11 using the simplest built-in feature. This Windows error checking tool acts as a friendly therapist walking through your digital storage to find any broken boxes.
Scanning a hard drive for bad sectors takes just a few clicks. Whether you are checking your main computer or a plugged-in external USB drive you just need to follow these exact give steps:
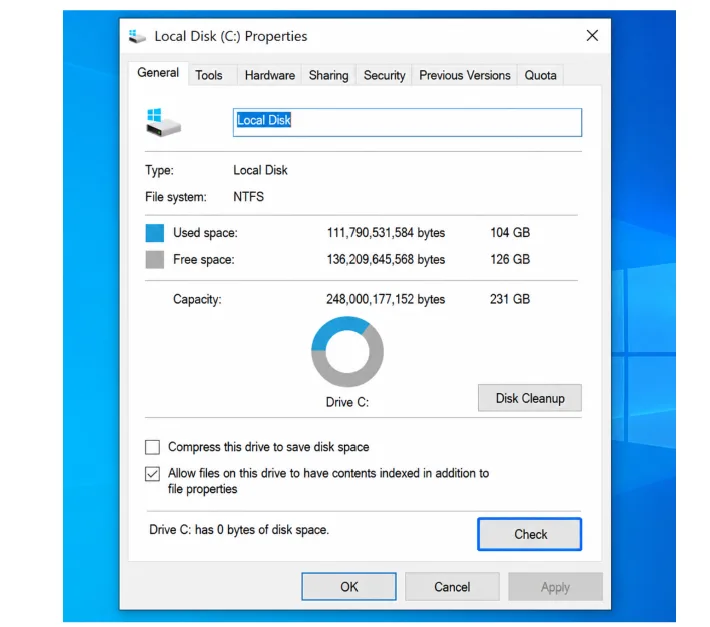
- Open This PC or File Explorer from your taskbar.
- Right-click the drive you want to inspect.
- Now Click on Properties at the bottom of the menu.
- Select the Tools tab at the top of the new window.
- Lastly click on Check button under the Error checking section.
Once the scan finishes a “No errors found” message means your storage is perfectly safe. However if the tool detects a stubborn physical issue it cannot bypass therefore you might need a stronger solution. For a more deep repair you should use CHKDSK command.
Use Powerful Options CHKDSK Command to Repair File Systems
Sometimes basic scans are not enough. Just like a mechanic cannot repair a car’s engine while driving down the highway similarly Windows cannot fix your main drive while you are actively using it. Check bad sectors on hard drive by using the Command Prompt will solve this issue scheduling a “boot-time scan” that safely runs upon your next restart.
Type specific commands known as “flags” into your command prompt and these tell the system exactly how to check for bad sectors:
- /f (Fix): Automatically corrects basic software and file errors.
- /r (Repair): It detects physical damage and places a digital “Do Not Use” sticker on the damaged areas that will protect future files from getting saved there.
- /x (Force): You should stop all active drive tasks before scanning begins.
Writing simple commands like chkdsk C: /f /r will generate powerful command-line recovery options. If the window asks to schedule the scan on your next restart well then simply press ‘Y’ and reboot your computer. Windows relies on this text based tool and Apple users have their own built-in guardian.
Run First Aid to Check Your Mac Drive
While Windows relies on typed commands however Apple provides a friendly built-in solution. If you need to know how to check a hard disk for bad sectors on a Mac machine well then the Disk Utility is a simple answer. Think of this tool as an inspector checking your digital filing cabinet to ensure your data is completely secure.
You need to follow these Mac Disk Utility First Aid instructions to test your storage:
- Open Applications, select the Utilities folder and launch Disk Utility.
- Choose your internal Mac drive or you can plugged-in external drive from the left menu.
- And just click the First Aid button at the top of the screen then select Run.
- Wait for the green check mark and the “Operation Successful” message which confirm that your drive is in good condition.
Seeing success message provides immediate peace of mind. But what if the physical disk itself is wearing out? If you want to detect those hidden hardware warnings before they crash then you must rely on S.M.A.R.T. status monitoring.
How to Check S.M.A.R.T. Status of a Hard Drive
Just imagine if your car could warn you before breaking down similarly your hard drive also has a similar built-in warning system called S.M.A.R.T. (Self-Monitoring, Analysis, and Reporting Technology). To read these hidden sensors you can download free disk test utilities. These helpful utility programs translate complex and invisible data into a simple dashboard that gives you a clear report on your storage’s physical health.
When interpreting S.M.A.R.T. status attributes you just need to look for the colors. “Good” (green) means perfect health and “Caution” (yellow) warns you to back up your documents immediately. A “Critical” (red) alert means your drive is actively dying. You can easily set these tools to automate hard drive reliability monitoring letting them quietly watch for trouble in the background. If those red or yellow alarms finally flash, you are faced with deciding between a repair and a replacement.
How to Decide Between Hard Drive Repair and Replacement
Check bad sectors on hard drive and finding a few does not always mean your hard drive needs to be replaced immediately. In some cases Windows can isolate damaged sectors and drive may continue working for some time. However if the number of bad sectors keeps increasing your system frequently crashes, files become corrupted or the drive makes unusual noises well these are signs that hardware may be failing.
As a general rule if bad sectors continue to appear after your scan or repair attempt then it is best to back up all your data and consider replacing the drive. Continuing using failing hard drive will increase the risk of data loss and sudden system issues.
- The drive makes repetitive clicking or grinding sounds.
- Scans consistently and finds new damaged spots.
- And S.M.A.R.T. health warnings appear.
Unable to Access Files on a Damaged Hard Drive?
If your hard drive contains bad sectors and some files have already become inaccessible now at this stage backing up data may no longer be possible through normal methods. In such situations you can use FreeViewer Hard Drive Recovery Software that will help you recover documents, photos, videos and other data from damaged, corrupted or inaccessible hard drives easily and securely.
How to Avoid Data Loss from Disk Errors
You must check bad sectors on your hard drive that will completely help you to protect your digital life. While no hard drive lasts forever so you can keep your files safe by identifying early warning signs. You should set monthly calendar reminder today for this quick health check. With this simple maintenance routine you can easily protect your most valuable digital data and give you true peace of mind whenever you turn on your computer.